The Fresh Loaf

A Community of Amateur Bakers and Artisan Bread Enthusiasts.

zolablue's blog

zolablue's picture
zolablue

This is a new recipe I made from Daniel Leader’s book, Local Breads, for a Parisian loaf of Pierre Nury’s who is a recipient of the prestigious Meilleur Ouvrier de France award, as noted in the book.This is a very rustic light rye considered to be his signature loaf and is compared to Italian ciabatta.

It was very interesting to make and loads of fun although my timeline didn’t quite match Leader’s description of what would take place in the amount of time noted.I have made notes below in the recipe for how this worked for me.

This is delicious bread!I will definitely bake this loaf again.The recipe is so simple I see it as almost a no fail bread.The flavor is very good and I would describe it so far as the most tangy bread I’ve made to date keeping in mind my sourdoughs are very mild.I think it is really an outstanding flavor and toasted it is wonderful with a real depth of flavor.

The crumb is beautiful and very moist and almost spongy.It is very open like a ciabatta which just seemed so odd to me after such a long, overnight rise.

Here is the recipe for those of you who might like to give it a try.

Pierre Nury’s Rustic Light Rye – © Daniel Leader, Local Breads

Makes 2 long free-form loaves (18 ounces/518 grams each)Time:

8 – 12 hours to prepare the levain

20 minutes to mix and rest the dough

10 to 12 minutes to knead

3 to 4 hours to ferment

12 to 24 hours to retard

20 to 30 minutes to bake

Levain:

45 grams - stiff dough levain(45%)

50 grams – water (50%)

95 grams – bread flour, preferably high-gluten (I used KA Sir Lancelot) (95%)

5 grams – stone-ground whole wheat flour (5%)

Prepare levain by kneading and place into a covered container.Let stand at room temperature (70 to 75 degrees F) for 8 to 12 hours until it has risen into a dome and has doubled in volume.*

Bread dough:

400 grams – water (80%)

450 grams – bread flour, preferably high-gluten (I used Sir Lancelot) (90%)

50 grams – fine or medium rye flour (I used KA medium) (10%)

125 grams - levain starter**

10 grams – sea salt (I used kosher)

Mix:

Pour water into bowl of a stand mixer.Add the bread flour and rye flour and stir until it absorbs all of the water and a dough forms.Cover and autolyse for 20 minutes.

Knead:

Add the levain and salt.By machine, mix on medium speed (4 on a Kitchenaid mixer) until it is glossy, smooth and very stretchy for 12 to 14 minutes.***This dough is very sticky and will not clear the sides of the bowl.Give the dough a windowpane test to judge its readiness by gently stretching a golf-ball sized piece until it is thin enough to see through and not tear.If it tears mix for another 1 to 2 minutes and test again.To get maximum volume in the baked loaf, make sure not to under-knead.

Ferment:

Transfer dough to a lightly oiled container and cover.Leave to rise at room temperature (70 to 75 degrees) for 1 hour.It will inflate only slightly.

Turn: (stretch and fold):

Turn the dough twice at 1-hour intervals.After second turn, cover dough and leave to rise until it expands into a dome twice its original size, 1 to 2 hours more.****It will feel supple, airy, and less sticky.

Retard:

Place the container in the refrigerator and allow the dough to ferment slowly for 12 to 24 hours.It will develop flavor but not rise significantly.Two to 3 hours before you want to bake, remove from refrigerator and let stand on the counter, covered.It will not rise and will feel cool.

Preheat oven:About 1 hour before baking heat oven (with baking stone) to 450°F.

Shape loaves:

Scrape dough onto floured counter and coat the top of the dough with flour.Press the mound of dough into a rough 10-inch square. Cut dough into 2 equal pieces (18 ounces/518 grams each).With floured hands, lift up one piece from the ends and in one smooth motion, gently stretch it to about 12 inches long and let it fall in whatever shape it may onto parchment paper.Repeat with the remaining piece of dough, spacing the two pieces at least 2 inches apart.(No need to score.)

Bake:

Steam oven as usual.Immediately after shaping, slide loaves, on the parchment, onto the baking stone.Bake until crust underneath the swirls of flour is walnut-colored, 20 to 30 minutes.

Cool:

Cool on wire rack for about 1 hour before slicing.Don’t be surprised by the long troughs running through the crumb.This is part of the bread’s character.

Store:

Store loaves with cut side covered in plastic at room temp for 3 to 4 days.For longer storage, freeze in resealable plastic bags for up to 1 month.

http://zolablue.smugmug.com/gallery/4189134#244767439

NOTES:

*Leader says to allow the levain only to double in the amount of time noted.My starter more than tripled in less than 6 hours so at that time I mixed the dough.I think this may have slowed my fermentation way down since my starter had not fully risen and collapsed but I find I am always at odds with Leader’s instructions on firm starters.

**The levain recipe calls for ingredients which make up more than is needed for the dough recipe which I find problematic only because it bugs me.I want instructions for making the amount I need for a recipe and not to have any levain as leftover.He does this in some recipes and not in others so to me that is another flaw in their editing.Just make sure you weigh the proper amount for the dough recipe.

***I used a DLX mixer at about medium speed for roughly 10 to 12 minutes.

****My dough did not rise more than about 25% (if that) in the container in more than three hours after fermentation started.Again, I think that was due to using my levain too soon.I chose to place the dough in my pantry overnight to rise instead of the refrigerator since it had not doubled as it was supposed to by that time.My pantry is very cold at 62°F now as it is on an outside wall and this allowed a good spot for the dough to ferment overnight instead. It rose to just over double by the time I was ready to bake it.That fermentation took about 17 hours total.

zolablue's picture
zolablue


Fall is in the air and beautiful blue-violet grapes are in the market and I could not resist the cartons of gorgeous, sweet scented concord grapes.  What better to do with them than to bake a grape focaccia.


The only other focaccia I’ve baked so far is Bill W’s wonderful sourdough raisin focaccia which I highly recommend.  I wanted to do a sourdough version of this one but being a bit inexperienced in this area I was unsure of how the sugar and oil may impact the sourdough so for this first grape focaccia I decided to use a small amount of starter and treat it more as an added ingredient for extra flavor.  (Me too chicken…?)  I also wanted to use some spelt flour and turbinado sugar so here is the recipe.


Concord Grape Focaccia


255g Concord grapes, seeded

310g water

76g liquid levain

300g bread flour
150g spelt flour
8g instant yeast
4g salt

1 tablespoon honey
2 – 3 tablespoons extra virgin olive oil
2 tablespoons turbinado sugar

1 tablespoon sanding sugar


Add sourdough starter to the water and dissolve.  In a mixing bowl, add the flour, instant yeast, honey, salt, and water (with starter mixed in).   Mix on medium speed for about 10 minutes.  Place in container and let rise until double.

Turn dough onto lightly floured counter and press into a round a little bigger than the oven form you will be using for baking.   I used a 9” x 2" round cake pan.  Pour 1 - 2 tablespoons of olive oil into the pan and swirl around to cover the sides.  Dump any excess oil onto the top of the dough in the center and spread to cover.  Pick up the dough quickly and place it over the baking pan allowing some of the dough to overflow the sides.  You will use this to flap over the grapes inside.

Place roughly 2/3 of the grapes into the form and press slightly into the dough.  Gather the edges of dough hanging over the pan and bring them together over the top of the grapes and slightly pinch together pressing down on the dough in the pan to make sure it is against all the sides.


Add the remaining grapes over the top slightly pressing them into the dough.  Drizzle about 2 tablespoons extra virgin olive oil over the top.  Then sprinkle 2 tablespoons of turbinado sugar followed by 1 tablespoon of sanding sugar over the top of that. 


Preheat the oven to 400°F while the dough begins to rise again – about a half hour.  The dough had reached the top of the cake pan. 


Bake for 20 – 25 minutes until golden brown on top. 


Remove from oven and take focaccia out of pan to cool on rack.  Cut into wedges and serve.


This was as if I’d filled it with grape jelly and it smelled amazing.  The dough was very soft and I suppose that was due to the sourdough starter I added.  I’m not sure if the spelt had anything to do with that as I’ve only baked with spelt a few times adding it to other sourdough loaves.  It was really gooey and delicious.


I am going to make this again later in the week but try and press the dough out flatter and bake on a stone so the bottom gets nice and browned as well.  I also think I’ll add more spelt and reduce the bread flour just to see how that tastes.  This was almost like a cake bread, very spongy and soft and moist.  Not too sweet either even with the sugars sprinkled on top. I think for the size and shape I baked the amount of grapes was perfect although I think if I flatten it into a larger shape I will increase the amount of grapes used just to make sure it covers the dough adequately.  Ugh, they’re so much fun to seed…not.  But it is well worth the effort. 


This was really fun and I don’t know how I can improve on the flavor of it but we’ll see. I think it will be a fun recipe to experiment with.  I’ll post more results here as I tweak and see what works best because the concord grapes won’t be here forever.


http://zolablue.smugmug.com/gallery/3648690#208178433

   
zolablue's picture
zolablue

I baked this very large, rustic Italian loaf (pagnotta) a couple weeks ago from Daniel Leader’s wonderful new book, Local Breads, page 197.  He states that it is to bake until almost black or charred for the most authentic loaf.  I didn’t go quite that far but you can see it developed a lot of color which I always prefer in my loaves.


I generally don’t bake the large boules since there are only two of us rather I prefer to divide a larger recipe and make more loaves so I can share them.  At any rate, I wanted to try the large boule and it was quite an impressive loaf.  (It reminded me of a fully expanded Jiffy Pop for those of you that can relate to that visual.) 


It is renowned in Italy for its great keeping quality, staying fresh up to 7 days.  Unfortunately, ours was not entirely eaten, I hate to admit, but it did allow me to see just how long it stays moist and fresh as is its reputation.  Nearly 10 days after baking it I was shocked to see that the bread still appeared very moist and had no signs of mold having been kept at room temperature in a KAF bread bag.


The recipe uses a biga naturale which Leader calls “Italian sourdough” and also uses a very small amount of commercial yeast.  I’m not sure why the instant yeast is there but that is the recipe.  I do not add commercial yeast to my sourdoughs but I wanted to bake it the first time following the recipe.  I would really like to try it again without the addition of the instant yeast to see what happens.


The flour in the recipe, except for the sourdough, is all high gluten for which I used Sir Lancelot high gluten flour.  The bran sprinkled on the top makes a really beautiful loaf although it is very messy to cut but very well worth it.  I would like to incorporate that in other loaves for the beautiful texture it creates. 


The crumb had a beautiful color and texture.


The Genzano Country Bread was a lot of fun to bake, wonderful tasting and seems an easy recipe for a great boule.  I hope you give it a try.


More photos can be seen here:

http://zolablue.smugmug.com/gallery/3585722#203734681

  
zolablue's picture
zolablue

I just posted the Semolina Sandwich Loaf ( http://www.thefreshloaf.com/node/4213/semolina-sandwich-loaf ) and wanted to share my experience making this sourdough version of Maggie Glezer’s.

This was really a nice little loaf with a great crust and also a very moist and beautiful crumb. It surprised me with the nice oven spring it had for such a seemingly small loaf.

The crumb has a beautiful yellow cast as well but the recipe uses AP flour in addition to the semolina (durum patent flour) so it was not as intensely yellow as the sandwich loaf which was 100% semolina flour.

I only proofed these loaves for 4 hours, rather than the 5 estimated by Glezer but I generally have a fast starter or it could have been the room temp that day. They were not large loaves and I goofed and preheated my oven to about 550 as I normally do but would not repeat that. I ended up baking them about 40 minutes but I did cover them at the end to keep them from getting even darker. Preheating the oven to the correct temp for this type of loaf would be much better.

I have to say again, this bread was wonderful. My neighbor who got the other loaf just loved it. I baked this bread the same day (last weekend) as the semolina sandwich loaf and it is still extremely moist. It was delicious last night used to sop up sauce from eggplant parmesan served with juicy grilled chicken (yum!).

This was, again, what I felt was a straight forward and rather easy recipe. Most of the time you spend is waiting but it was really fun to mix up and so easy to make into little loaves. I loved it and it you try it I hope you like it, too.

More photos here:

http://zolablue.smugmug.com/gallery/3506188#197819612

Sourdough Semolina Bread – Maggie Glezer, A Blessing of Bread

Skill Level: Expert

Time: About 20 hours (about 8 1/2 hours on baking day)

Makes: Two 1-pound (450 gram) breads

Recipe Synopsis: Make a sourdough starter and let it ferment overnight for 8 to 12 hours. The next day, mix the dough and let it ferment for 2 hours. Shape the dough and let it proof for 5 hours. Bake the breads for about 45 minutes.

For sourdough starter:

2 tablespoons (30 grams/1.1 ounces) very active, fully fermented firm sourdough starter, refreshed 8 to 12 hours earlier

1/3 cup (80 grams/2.8 ounces) warm water

About 1 cup (135 grams/4.8 ounces) unbleached AP flour

For final dough:

1 1/3 cups (225 grams/7.9 ounces) fine semolina flour

1 2/3 cups (225 grams/7.9 ounces) unbleached AP flour

1 1/3 cups (300 grams/10.6 ounces) warm water

2 1/4 teaspoons (11 grams/0.4 ounce) table salt

1 tablespoon (18 grams/0.6 ounce) mild honey or 1 tablespoon plus 1 1/2 teaspoons (21 grams/0.8 ounce) granulated sugar

Fully fermented starter

EVENING BEFORE BAKING

Mixing the sourdough starter: Rub starter into water until it is partially dissolved, then stir in the flour. Knead this firm dough until it is smooth. Remove 2/3 cup (135 grams/4.8 ounces) of the starter and place it in a sealed container at least four times its volume, to use in the final dough. (Place the remaining starter in a sealed container and refrigerate to use in the next bake.) Let the starter ferment until it has tripled in volume and is just starting to deflate, 8 to 12 hours.

BAKING DAY

Mixing the autolyze: In the bowl of a stand mixer, combine the semolina and AP flour. With the paddle attachment on low speed, stir in the warm water until well combined. The dough will look very granular and wet. Let the dough rest covered for 20 minutes.

Mixing the dough: Add the salt, honey or sugar, and starter to the dough and mix on medium speed with the dough hook for about 10 minutes, or until the dough cleans the sides of the bowl and becomes very extensible. If you did not weigh your flour to measure it, be prepared to adjust the consistency of the dough. The consistency will also be profoundly influenced by the degree to which the semolina was milled and its freshness. Add at least a tablespoon or two of water if the dough is very firm, or at least a tablespoon or two of flour if the dough is impossibly sticky and does not clean the sides of the bowl. The dough should feel very soft and tacky but be easy to handle and have a smooth sheen; it should clean the bowl at the beginning of kneading.

Fermenting: Place the dough in a large bowl and cover it with plastic wrap. Let the dough ferment for about 2 hours. It will probably not rise much, if at all.

Shaping and proofing: Line a large baking sheet with parchment paper or oil it, or flour two linen-lined bannetons. Turn the dough out onto a lightly floured surface. Divide the dough in half. Shape it into simple rounds or long shapes and position the loaves seam side down on the prepared sheet or in the bannetons. Cover well with plastic wrap and proof at room temperature. It should triple in size; about 5 hours.

Preheating the oven: One hour before baking, position an oven rack in the upper third position and remove any racks above it. Place a baking stone on it, if desired, and preheat the oven to 425°F (220°C/gas mark 7).

Baking: When the loaves have tripled and do not push back when gently pressed with your finger but remain indented, they are ready to bake. If you have proofed them in bannetons, flip each one onto your hand first, then flip it seam side down onto an oiled baking sheet or, if using a baking stone, onto a semolina-sprinkled peel. Score the loaves with a single-edged razor blade in a decorative pattern. Spray or brush them with water and bake for 45 to 50 minutes, until very well browned. After the first 30 minutes of baking, switch the loaves from front to back so that they brown evenly. When the loaves are done, remove them from the oven and let them cool on a rack.

zolablue's picture
zolablue

I’ve been so curious about semolina flour.I didn’t understand much about it and there doesn’t seem to be a lot of information regarding it.After reading as much as I could find in various bread books I decided I had to take a stab at it.So last weekend I baked this yeasted sandwich version along with another sourdough version. (I will post that one separately.)

I found the perfect, fresh durum patent flour at Heartland Mill which has been such a great source so far in providing harder-to-find flours.The shipping and handling is a bit steep but so far I can’t find a local source for this particular semolina or the wonderful Golden Buffalo high-extraction flour that is so perfect for the Thom Leonard Country French.

http://www.heartlandmill.com/

This bread showed the most incredible oven spring that I snapped a couple photos while still in the loaf pan for perspective to show just how high that thing ballooned.The first time I opened the oven to rotate the pan I actually gasped.Then I broke into laughter.You all know that feeling!:o)

It is such a beautiful loaf in so many ways but also very delicious and moist.This is a big keeper recipe for me and I remain intrigued by the nutty, sweet flavor of semolina.If you are looking for a very tender and flavorful sandwich loaf this is a great choice.Another plus is the recipe is quite easy and very quick.I think from beginning of initial fermentation to pulling the baked loaf from the oven was just under 4 hours.

It also makes delicious toast and, for me, the beautiful saffron colored crumb is just outstanding.

Excerpted: Leader told how he received an urgent phone call the night before he left Altamura telling him that his guide had forgotten to show him this bread – a straight dough semolina loaf made by Altamura bakers specifically for sandwiches.A loaf was quickly delivered to his hotel room and he expressed gladness when he saw the gorgeous red-gold loaf with a delicate crust and even golden crumb.He said it was unlike any sandwich bread he’d tasted and how his customers would love its rich wheat flavor and olive oil perfume.The small amount of sugar gives this bread great tenderness. As he mentions this recipe is a great introduction to the unique character of semolina flour.I agree.

More photos can be seen here:

http://zolablue.smugmug.com/gallery/3505682#197785385

Semolina Sandwich Loaf – Daniel Leader, Local Breads

Time:8 to 12 minutes to knead; 1 1/2 to 2 hours to ferment; 1 to 1 1/2 hours to proof; 35 to 45 minutes to bake

Makes:1 Sandwich loaf (31.2 ounces/885 grams)

300 grams (1 1/2 cups/10.6 ounces) water, tepid (70 to 78 degrees) – 60%

5 grams (1 teaspoon/0.2 ounce) instant yeast – 1%

500 grams (3 1/4 cups/17.6 ounces) fine semolina (durum) flour – 100%

15 grams (1 tablespoon/0.5 ounce) granulated sugar – 3%

50 grams (1/4 cup/1.8 ounces) extra-virgin olive oil – 10%

10 grams (1 1/2 teaspoons/0.4 ounce) sea salt – 2%

Mixing the dough:Pour the water into a large mixing bowl or the bowl of a stand mixer.Add the yeast, flour, sugar, olive oil and salt and stir with a rubber spatula just until a rough dough forms.

Kneading – By hand:Lightly dust the counter with semolina flour.Scrape the dough out of the bowl and knead it with smooth, steady strokes until it is very smooth, shiny, and elastic, 10 to 12 minutes.

By machine:Use the dough hook and mix the dough on medium speed (4 on a KitchenAid mixer) until it is very smooth, shiny, and elastic, 8 to 9 minutes.

Fermentation:Transfer the dough to a lightly oiled container with a lid.Cover and leave to rise at room temperature (70 to 75 degrees) until it inflates into a dome, reaching double; 1 1/2 to 2 hours.

Shaping loaf:Grease a loaf pan (8 1/2 x 4 1/2) with oil.Lightly dust the counter with semolina flour.Uncover the dough and turn it out onto the counter.Form the dough into a pan loaf.Nestle the loaf into the pan, seam side down, pressing it gently to fit.Lightly dust the top of the loaf with semolina flour and cover the pan with plastic wrap.

Proofing:Let the loaf rise at room temperature (70 to 75 degrees) until it crowns just above the rim of the pan, 1 to 1 1/2 hours.

Preparing oven:About 15 minutes before baking place rack in middle of oven.Preheat oven to 375°F.

Baking:Place the loaf on the middle rack of the oven.Bake until the loaf pulls away from the sides of the pan and the crust is a deep golden brown, 35 to 45 minutes.

Cooling and storing:Remove loaf from pan and allow to cool, right side up.Cool bread completely before slicing, about 1 hour.Store the cut loaf in a resealable plastic bag at room temperature.It will stay fresh for about 3 days.For longer storage, freeze in a resealable plastic bag for up to 1 month.

zolablue's picture
zolablue

I baked my first challah last Thursday and wanted to share.

I was unsure what to expect but it was so much fun. I’d been meaning for some time to bake a recipe from Maggie Glezer’s book, A Blessing of Bread, which is a wonderful compilation of traditional Jewish recipes from around the world. Floyd has written a very nice review of the book here.

http://www.thefreshloaf.com/bookreviews/ablessingofbread

I decided to start with Glezer’s own personal recipe for sourdough challah. I love making sourdough and was interested to see what the texture of this bread would be compared to a yeasted challah which I have eaten only a couple times.

The recipe seemed easy to me despite the fact Glezer calls it expert. I’m not sure why but, again, I’m new to challah. The dough was so easy to mix together and then, as Glezer puts it, the time involved is mostly waiting after that.

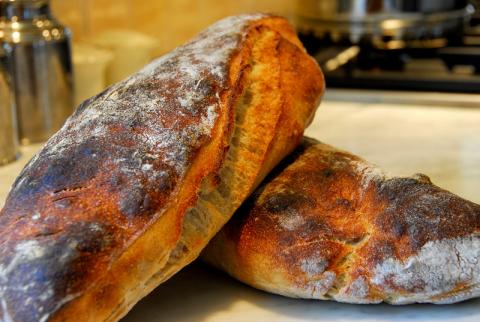
She says to bake it to a dark brown which I did. I’m not sure if it is considered too dark or not but it was really a beautiful color and I do typically bake my bread darker as she instructs in Artisan Baking.

The crumb was amazing to me. It was very creamy and soft and almost reminded me of an angel food cake. It has remained moist to this day (5 days later) as there are only two of us to eat and can’t quite get rid of all the bread I bake. I am going to cut very thick slices of what is remaining to freeze and later use to make French toast.

I decided for my maiden voyage into challah bread I would make an elaborate braid. I used the six-strand braid version and got a lot of help from the video Glezer did showing how to do it. Gosh, the internet is awesome! Just as she said it makes a beautiful, very high loaf.

Braiding ChallahFine Cooking Video, Maggie Glezer

http://www.taunton.com/finecooking/videos/braiding-challah.aspx?

I’m posting the recipe so those of you who are new to challah as I am can have a chance to make it and perhaps will be inspired to buy this lovely book. For those who have made challah for years I’d love it if you tried the recipe and let me know your thoughts on it compared the some of your favorite traditional recipes.

More of my photos can be seen here:

http://zolablue.smugmug.com/gallery/3500289#197395950

Thank you to each and every one of you on this site that have been such inspirations in baking such as Floyd, Bill Wraith, Susanfnp, Mountaindog, JMonkey, Browndog, Bluezebra, Eric, SDBaker, Mini Oven, Dolf, Qahtan, Zainab and so many others. All you wonderful bakers have helped me incredibly along the way over the past few months that I have been baking so many thanks to all.

My Sourdough Challah - Maggie Glezer's personal recipe from her book, A Blessing of Bread

Sweet sourdough breads are delicious and well worth the time (which is mainly waiting time) if you are a sourdough baker. The sourdough adds a subtle tang to my challah, and the crumb has a moister, creamier texture that keeps even longer than the yeasted version. While it’s true that challah or, for that matter, all bread was at one time sourdough (the Hebrew word for leaven, chametz, means “sour”), challahs have definitely gotten sweeter and richer since the introduction of commercial yeast. To convert such recipes back to 100 percent sourdough, the sugar has to be cut back in order for the dough to rise in a reasonable length of time (sugar that is more than 12 percent of the flour weight inhibits fermentation), so this version will taste slightly less sweet than the yeasted one, a deficit completely overridden by the rich complexity of the sourdough. I have also changed the all-purpose flour to bread flour, which has more gluten, to counteract the starter’s propensity to loosen the gluten (the acids in the starter change the proteins, a natural part of sourdough baking).

Skill Level: Expert

Time: About 20 hours (about 8 1/2 hours on baking day)

Makes: Two 1-pound (450-gram) challahs, one 1 1/2-pound (680-gram) challah plus three rolls, or sixteen 2-ounce (60-gram) rolls

Recipe synopsis: Make the sourdough starter and let if ferment overnight for 12 hours. The next day, mix the dough and let it ferment for 2 hours. Shape the dough and let it proof for 5 hours. Bake the breads for 15 to 40 minutes, depending on their size.

For the starter:

2 tablespoons (35 grams/1.2 ounces) very active, fully fermented firm sourdough starter, refreshed 8 to 12 hours earlier

1/3 cup (80 grams/2.8 ounces) warm water

About 1 cup (135 grams/4.8 ounces) bread flour

For final dough:

1/4 cup (60 grams/2 ounces) warm water

3 large eggs, plus 1 for glazing

1 1/2 teaspoons (8 grams/0.3 ounce) table salt

1/4 cup (55 grams/1.9 ounces) vegetable oil

3 tablespoons (65 grams/2.3 ounces) mild honey or a scant 1/3 cup (60 grams/2.1 ounces) granulated sugar

About 3 cups (400 grams/14 ounces) bread flour

Fully fermented sourdough starter

Evening before baking - mixing the sourdough starter: Knead starter into water until it is partially dissolved, then stir in the flour. Knead this firm dough until it is smooth. Remove 1 cup (200grams/7 ounces) of the starter to use in the final dough and place it in a sealed container at least four times its volume. (Place the remaining starter in a sealed container and refrigerate to use in the next bake.) Let the starter ferment until it has tripled in volume and is just starting to deflate, 8 to 12 hours.

Baking day - Mixing the dough:

In a large bowl, beat together the water, the 3 eggs, salt, oil, and honey (measure the oil first, then use the same cup for measuring the honey — the oil will coat the cup and let the honey just slip right out) or sugar until the salt has dissolved and the mixture is fairly well combined. With your hands or a wooden spoon, mix in the bread flour all at once. When the mixture is a shaggy ball, scrape it out onto your work surface, add the starter, and knead until the dough is smooth, no more than 10 minutes. (Soak your mixing bowl in hot water now to clean and warm it for fermenting the dough.) This dough is very firm and should feel almost like modeling clay. If the dough is too firm to knead easily, add a tablespoon or two of water to it; if it seems too wet, add a few tablespoons flour.

The dough should feel smooth and very firm but be easy to knead.

Fermenting the dough:

Place the dough in the warm cleaned bowl and cover it with plastic wrap. Let the dough ferment for about 2 hours. It will probably not rise much, if at all.

Shaping and proofing the dough:

Line one or two large baking sheets, with parchment paper or oil them. Divide the dough into two 1-pound (450-gram) portions for loaves, one 1 1/2 pound (680-gram) portion for a large loaf and three small pieces for rolls (the easiest way to do this without a scale is to divide the dough into quarters and use one quarter for the rolls and the rest for the large loaf), or sixteen 2-ounce (60-gram) portions for rolls. Braid or shape them as desired, position them on the prepared sheet(s), and cover them well with plastic wrap. Let proof until tripled in size, about 5 hours.

Meanwhile, 30 minutes before baking, arrange the oven racks in the lower and upper third positions if using two baking sheets or arrange one rack in the upper third position if using one sheet, and remove any racks above them. Preheat the oven to 350°F (180°C/gas mark 4). If desired, preheat one or two baking sheets to double with the baking sheet(s) the loaves are on. Beat the remaining egg with a pinch of salt for glazing the breads.

Baking the loaves:

When the loaves have tripled and do not push back when gently pressed with your finger but remain indented, brush them with the egg glaze. Bake rolls for 15 to 20 minutes, the 1-pound (450-gram) loaves for 25 to 35 minutes, or the 1 1/2-pound (680-gram) loaf for 35 to 45 minutes, until very well browned. After the first 20 minutes of baking, switch the loaves from front to back so that they brown evenly; if the large loaf is browning too quickly, tent it with foil. When the loaves are done, remove them from the oven and let cool on a rack.

zolablue's picture
zolablue

I baked my very old recipe for pumpkin bread this weekend. I love this very spicy recipe and like to add more cinnamon than called for as I always do with that spice. It is a very moist pumpkin bread and also very fragrant. You can see how easy it is to make as well. You basically measure and dump everything together and mix.

The batter is cake-like and easily ladled into whatever baking dish or mold you choose. I love to make these in the NordicWare mini-rose bundt pans. This recipe makes 15 roses when filled only 2/3 full. Each rose is a one-cup mold so that gives you an idea of the yield. I haven’t made it in the small loaf pans for quite a while but if I remember it makes at least 3 or 4 small loaf pans.

NordicWare makes many wonderful forms so the sky is the limit. I love these wonderful heavy pans and the baked goods are so easy to get out. No worry at all. I just give a quick spray with Pam and they fall right out.

Hope you might think about trying this recipe when you want a nice, moist, spicy treat.


http://zolablue.smugmug.com/gallery/3442287#193165324


Pumpkin Bread

3 cups sugar

1 cup oil

4 large eggs

2/3 cup water

2 cups pumpkin

1 teaspoon vanilla

3 1/3 cups flour

2 teaspoons baking soda

1 1/2 teaspoon salt

1 1/2 teaspoon cinnamon

1 teaspoon nutmeg

1 teaspoon cloves

1 cup chopped nuts (optional)

Preheat oven to 350°F.

In a bowl, mix together flour, baking soda, salt and spices. Set aside

Cream sugar and oil together. Add eggs one at a time. Add vanilla, pumpkin, water, and dry ingredients. Mix together until just combined.

Grease pans well. Fill pans, cans or molds 2/3 full.

Bake 50 – 60 minutes if using loaf pans or 25 – 30 minutes for the rose mold or similar mini-bundt pan size. Bake until a toothpick poked in the center comes out clean. Do not over bake.

zolablue's picture
zolablue

Also known as Baguette aux lardons.


This is fabulous bread!  I baked it yesterday from Daniel Leader’s new book, Local Breads.  It is a very easy recipe, absolutely delicious fresh from the oven and today it made incredible toast.  The incorporation of slightly browned bacon and his recommendation to retard the shaped loaves overnight to infuse the dough with more of that great smoky bacon flavor is a winner.


His recipe calls for making four 316g baguettes but for some reason I only ended up with about 1100g total dough so I made 3 roughly 366g baguettes.  The dough was supple and slashed really well which I was concerned about with the bacon.  No problem though.


His method of using floured parchment and then making your own couche worked really well for this.  I was able to fit all three baguettes perfectly on a quarter-sheet restaurant style pan with rolled up dish cloths on each side to keep the loaves from spreading.  You make the troughs for the dough creasing the parchment between each loaf and then tuck the rolled cloths against them and the rim of the sheet pan. 


The next day I removed from the fridge and slid the entire thing onto the counter, took off the plastic wrap and covered with a cotton flour-sack towel.  I let them warm up and finish proofing for about 2 hours and then baked.  Even in my small oven all three loaves fit perfectly on my smaller-than-normal baking stone.  I steamed the oven and baked them about 25 minutes at 450°F and was really happy with the way they rose and actually grew ears.  (chuckle)  That is always welcome and always surprising for my breads, it seems but I’m getting better. 


I have not typed up this recipe yet.  I encourage you all to go buy Daniel Leader’s new book.  This is the first of his two books I have purchased so others are way ahead of me in the knowledge of his great breads and first book.  Mountaindog is lucky enough to live close to his bakery – wow!  That would be a treat.  So far in what I’ve read I’m very impressed with this book although since I use a firm starter I do have a couple thoughts that may differ from what his instructions are only by means of my own experience.  All in all it is a wonderful book and I’m thrilled to have it.  Can’t wait to try more new recipes.

Baguettes aux lardons

Great crisp crust and you can see how the bacon bits on the exterior crisp when baked. (yum)

Crumb was creamy with bacon infused throughout in little bits.  He doesn't show a photo of the crumb so I'm hoping this is how it is supposed to look.  He does have you beat the tar out of the dough and with a mixer it does break down the already small cooked pieces.  I didn't mind. :o)

zolablue's picture
zolablue

I'm posting this recipe for discussion as we have been talking about it on the Glezer firm starter thread.  I have made this bread often with variations because I did not have the high-extraction flour yet.  I recently purchased the Golden Buffalo flour from Heartland Mill in Kansas and it was superb.  I didn’t take photos of those so will next time I make it.


The one pictured here was made using Hodgson Mill WW graham flour sifted for the WW portion (250g) and mixed with the 750g King Arthur bread flour.  I’ve also made it sifting the King Arthur traditional and organic WW flours but I like the sweetness of the graham flour.  Still, I think after using that high-extraction flour the flavor was so extraordinary I would choose to make it that way more often.


Mountaindog has also posted her variation on this bread here and she makes beautiful loaves of it. 

http://www.thefreshloaf.com/node/1806/thom-leonard-country-french-boule-recipe

This is a great recipe to play around with and it always comes out fabulous bread.  Another note – I generally like to make four smaller boules but when I made them with the high-extraction flour I made two boules and they were large and fantastic. 


Here are the some photos of the ones I made a few months ago (more photos here: http://zolablue.smugmug.com/gallery/2671417#141408937 ) and the recipe follows:

Thom Leonard’s Country French Bread - © Maggie Glezer, Artisan Baking  

Makes one 4 pound (1.8-kilo) loafTime: At least 18 hours with about 30 minutes of active work 

Much of what makes this bread so special is the high-extraction flour used in it.  This is a bolted whole-wheat flour much lighter in color and sweeter in flavor than a whole-wheat flour (at 100% extraction), but much darker and more flavorful than a white flour (at 72% extraction).


The method I give here for making your own high-extraction flour will work best on coarsely ground whole wheat flour.  If you already have a good high-extraction flour, substitute it for the whole-wheat and bread flour in the final recipe.  Thom also includes a little of his sourdough rye starter in the dough, but it is such a small amount that I have bumped up the levain slightly and added rye flour to the final dough instead.

RECIPE SYNOPSIS The evening before baking - making the Levain: 

25 grams (1 1/2 tablespoons or 0.8 oz) fermented firm sourdough starter refreshed 8 hrs before (17%)

140 grams (2/3 cup or 4.9 oz) water, lukewarm (100%)

140 grams (1 cup minus 1 tablespoon or 4.9 oz) unbleached bread flour (100%)


Dissolve the sourdough starter in the water in a small bowl.  Add the flour and beat this batter-like dough until very smooth. Place in a covered container and let it ferment overnight for 8 hours, or until fully risen and just starting to sink in the middle.

Bake Day – Mixing the Dough: 

350 grams (about 12 oz or about 2 1/2 cups) Coarsely ground whole-wheat flour, preferably milled from an organic, hard winter wheat (eventually 25%)

750 grams (26.5 oz or 5 cups) unbleached bread flour, preferably organic (75%)

30 grams (1 oz or 1/4 cup) organic whole-rye flour (3%)

660 grams (24 oz or 3 cups) water (66%)

Fermented levain (30%)

23 grams (0.8 oz or 1 tablespoon plus 1 1/2 teaspoons) salt (2.3%)

Preparing the flour: 

Sift the whole-wheat through your finest sieve or flour sifter.  The large flakes of bran should be caught in the sieve (use them for flouring your peel or for muffins).  Measure out 2 cups 3 tablespoons (8.8 ounces, 250 grams) sifted flour.  Mix this dark flour with the bread flour and the rye flour in a large bowl or in the work bowl of your mixer.


Add the water to the fermented levain to loosen it from the container.


Mixing the dough: 

By hand:  Pour the watered levain into the flours and stir with your hands or a wooden spoon just until a rough dough forms.  Turn the dough out onto the unfloured work surface and continue kneading until the dough is very smooth and shiny, about 10 minutes.  This is a lot of dough and will take some muscle.  Sprinkle on the salt and continue to knead the bread until the salt has fully dissolved and the dough is very smooth and shiny.


By stand mixer:  Add the watered levain to the flours in the work bowl and stir the dough together with a wooden spoon or your hand (this will make the mixing go more quickly).  Using the dough hook, mix the dough on medium speed for about 10 to 15 minutes, or until the dough is very smooth and almost cleans the bowl.  Add the salt and continue mixing until the dough is much tighter and cleans the bowl, about 5 more minutes.

This should be a soft, sticky, and extensible dough.  

Fermenting and turning the dough:  

Place the dough in a container at least 3 times its size and cover it tightly with plastic wrap. Let it ferment until it is airy and well expanded but not yet double in bulk, about 3 hours.  Turn the dough 3 times at 30-minute intervals, that is, after 30, 60, and 90 minutes of fermenting, then leave the dough undisturbed for the remaining time.

Rounding and resting the dough: 

Flour the surface of the dough and your work surface and turn the dough out.  Tuck the edges of the dough in to tighten it, round it, and cover it loosely with plastic wrap.  Let it rest until well relaxed, 10 to 15 minutes.  While the dough is resting, sift flour over a linen-lined basket or line a large colander with a well-floured tea towel.

Shaping and proofing the dough: 

Shape the dough into an even and tight round loaf without deflating it.  Place the dough topside down in a linen-lined basket or large colander, lightly sprinkle it with flour, and cover it well with plastic wrap.  Proof the dough until it is well expanded, about doubled in volume and remains indented when lightly pressed with a floured finger, after about 4 hours.

Preheating the oven: 

At least 45 minutes before the dough is fully proofed, arrange a rack on the oven’s second-to-top shelf and place a baking stone on it.  Clear away all racks above the one being used Preheat the oven to 450°F (230°C).

Baking the bread: 

If desired, just before baking the bread, fill the oven with steam.  Turn the bread out onto a sheet of parchment paper or a floured peel and slash 3 to 4 diagonal slashes and 3 to 4 horizontal slashes into the top.  It will look like a skewed grid with diamond-shaped openings.  Slide the bread, still on the paper, onto the hot stone and bake until the bread is dark and evenly browned all around and sounds hollow when thumped on the bottom, 70 to 80 minutes, rotating it halfway into the bake.  If the bread is browning too quickly, reduce the oven temperature to 400°F (205°C), but still bake the bread for at least 70 minutes.  Let the bread cool on a rack.


zolablue's picture
zolablue

I wanted to make dill bread so used Floyd’s wonderful recipe for Potato Rosemary Rolls yesterday but replaced the rosemary and sage for a huge pile of fresh baby dill.  Then I added another huge pile of freshly ground black Tellicherry pepper.  We really like things spicy but I was afraid the amount of pepper I used would overpower the dill.  Not having made dill bread before (Tingull's looks so good) I also wanted to try using fresh dill to get a feel for the amount desired.  I ended up using 2 1/2 teaspoons of freshly ground pepper and roughly 4 packed tablespoons of chopped fresh baby dill.  The flavor was outstanding.  My husband loved them!

I really love the way these taste not only because of the potato and potato water, which also helps them keep longer, but just the richness of the dough and texture when you bite into it.  It has a kind of chewiness to the crust but still moist and the crumb is great for juicy hamburgers.  We did have grilled ground sirloin burgers with fresh chopped garlic mixed into the meat and grilled sliced Vidalia onions.  It made a fabulous hamburger. 

Besides adding quite a bit of extra pepper and substituting fresh dill instead of rosemary and sage I didn't make any other change to Floyd's recipe.  I did brush the top of the buns with unsalted butter when they were hot from the oven. 

Inspired by Floyd's, Potato Rosemary Rolls:

http://www.thefreshloaf.com/recipes/potatorosemaryrolls

And Tingull's, Country Dill Bread:

http://www.thefreshloaf.com/node/3298/country-dill

Subscribe to RSS - zolablue's blog