The Fresh Loaf

A Community of Amateur Bakers and Artisan Bread Enthusiasts.

PalwithnoovenP's blog

PalwithnoovenP's picture
PalwithnoovenP

NOTE: This post is NOT in anyway intended to offend, malign or make fun of anyone especially TFLers from Latin America or those who can speak and/or understand Spanish. Our country has lots of Spanish influence too and you could definitely trace it in our language; although the feminine form retained its offensive meaning, the term "puto" did not; it just always refers to a delicious treat. For the sake of clarity, all of the terms "puto" you will find here refers ONLY to steamed rice cakes. No hate comments please. Thank you! 

Our country favors rice as its staple. Everyday from breakfast, lunch, afternoon snack, dinner and even midnight snack we eat rice but for special occasions we do not settle for plain steamed white rice. We turn rice into simple to very complex festive dishes like arroz valeciana, bringhe (something like a coconut milk arroz), talulo (rice in banana leaf), hundreds of different rice cakes and puto. I know this is not as grand as other bread TFLers make but puto often takes the place of bread or sometimes even rice in festive occasions. In birthdays the famous trio of puto, pansit (Chinese style stir-fried noodles) and spaghetti is so prominent that when they are seen in ordinary days the first question is "Who has a birthday?" 


I grew up on the traditional puto with the optional topping of salted eggs or cheese that my dad buys from a town 2 hours away from us. Traditionally, top quality rice was soaked and ground in a stone grinder, mixed with sugar and water and allowed to ferment in clay jars for a day or two. When the batter has overflowed and full of bubbles, it is then poured into molds and steamed until done. When I learned about sourdough I realized that puto is essentially a steamed rice sourdough starter! When eaten, this style of puto has a slight tangy taste and a sweet but almost vinegary aroma. It is very similar to the Indian idli, the only difference is puto uses only rice.


Today there are various styles of puto, some have milk or eggs, made with part or all wheat flour instead of rice and leavened with commercial yeast or chemical leaveners. I developed this to fit everyone if that's possible; gluten free, dairy free and vegan if you do not put the toppings. It uses rice flour and baking powder, a bit modern but close to traditional puto.


I just mixed rice flour and water into a thin batter and sweetened it to taste, added salt and baking powder then I steamed it until done. I used my little llaneras that's why they're oval but they're commonly round. I also put some salted eggs and cheese on top just like they do in stores, I like the cheese more and I even hate salted eggs topped ones when I was a child. I will use a good Edam for special occasions but I doubt other gourmet cheeses, perhaps it won't taste right because my nostalgic taste screams for the processed supermarket cheese used here.


My first attempt with puto did not turn out so well. It looks okay at the top but the sides are sticky, too moist and brownish. The interior was gummy unlike the fine crumb pictured above. I used baking soda and vinegar before because I did not have baking powder on hand; I think it was the culprit, maybe there wasn't enough acid to react with the baking soda and the rice cakes have a weird salty taste and alkali smell and taste; it also didn't rise as much, maybe it's also undercooked because I was a bit excited to eat them.


Here they are while they were steaming. I put all the left over batter in my biggest llanera and topped with both cheese and salted eggs. In parties this size is considered small, puto 5 inches high and 20 inches in diameter is not uncommon in such occasions.


I also made a nostalgic snack that my dad buys from a nearby town, puto pao. I remember they were the muffin like about half the size of my fist filled with sweet salty pork and salted eggs. Puto pao is  combination of puto and siopao (which came from the siu bao in char siu bao- steamed meat buns) making them meat-filled steamed rice cakes. I filled them with my asado (soy sauce cooked pork) and topped them with salted eggs just like what I remember. Salted eggs will complement the filling better than cheese and even though I hate salted eggs before, I love them when they are on puto pao.


The puto is slightly sweet, extremely soft and fluffy with a very fine crumb. I think this batch is best reserved for plain puto because it is too delicate for the meat filling, maybe I should reduce the baking powder if I intend to make puto pao. Puto pao is an excellent snack though it may not sound appealing to many of you of because of the flavor combinations but they are a thousand times easier to make than char siu bao.

Maybe I should also pour the right amount of batter, I thought some are going to overflow but fortunately they did not, they just formed a muffin top.


The photo above has a good amount of batter but I like the next one better, a higher full dome without overhanging sides. It's just the nostalgia in me that wants them to look like what I used to have. (You can see how the llanera endured many of my baking adventures)


Here is the large puto, it looks like the mother of the little ones. Which camp are you? Salted eggs or cheese? There are some traitor salted eggs that allied themselves with the cheese camp! :P


The crumb was a bit dry because it was left in the fridge for 3 days but it was still good. I cooked some pancit today and paired it with the puto and we were transported immediately to a birthday party! :P


Sorry for this long post, I'm just happy with how this turned out!

Thank you very much! Job


PalwithnoovenP's picture
PalwithnoovenP

We recently had a surplus of eggs and we need to find ways on how to use them before they go bad. Our chickens are really prolific layers that their eggs can't even fit anymore in our fridge for storage. We made the usual, salted eggs and flan (with whole eggs) but there are still many left and more are added each day. We made egg salad with about three dozen eggs but there were still seven remaining. I think this is the perfect time for me to try an egg bread and make an experiment.

This bread stays true to its name. Aside from flour, salt and yeast; it only contains egg and honey for the liquid, no milk, butter or oil! You can clearly see the liquid components in this shot!


Most egg bread recipes I saw contains either butter or oil and one to a few eggs and mostly water to a relatively large amount of flour. Well, I don't think adding a single egg will merit to be named egg bread and adding butter mocks the eggs enriching ability.  Most of  egg bread's richness comes from the egg yolks so some recipes call for eggs and some extra yolks. I really hate to go to the trouble of separating eggs and then finding a use for the leftover whites so this brain of my mine come up with  a solution unexpectedly, keep the yolks the same and use the whites as a replacement for the water. Genius! No separating, storing or wasting whites so I experimented to see if using eggs alone with honey for flavor will make a great egg bread.

This bread has the most difficult to knead dough to date. If you saw the dough in the beginning I bet you would be skeptical too if this will come together without the addition of any more flour but I trusted my hand kneading skill and proceeded to knead the "porridge" oh I mean dough. It contains 7 bantam eggs which is equivalent to 4-4.5 normal eggs and quite a bit of honey so it's really rich, its like a leavened pasta dough.  It took me a good hour and a quarter for it to reach windowpane. It then goes to my standard procedure of a cold overnight rise.


The next day I saw that it did not rise as much unlike most breads I made but I proceeded anyway. I shaped it into snails and proofed it in my llaneras for a bit, it did not expand very well too. You can see in the photo there's not much difference in size.


They were then glazed with egg wash before being baked in the preheated clay pot for 20 minutes. I changed my timing to avoid burnt spots. The first 5 minutes with live fire and the rest just embers.


Here are the results. In fact the tops look just like they were not egg washed and look very similar to supermarket rolls just shaped differently; of course the difference in quality is very huge.

I can say they have a slight resemblance to kaiser rolls. 

The tops are not as browned as my previous bakes but the burnt spots on the bottoms were significantly reduced.


The aroma was unbelievable while they were cooling. The tops are soft with thin crust and the bottom is slightly crisp. The crumb is slightly dry but still soft and a bit difficult to cut (maybe it's just because of the absence of a good serrated knife). They are not delicate or feathery like a challah or a brioche but they are super rich tasting. It is lightly sweet and the aroma of honey is dominant along with a pleasant "eggy" flavor. They are flavorful enough to be eaten on their own. Their hearty nature is perfect for saucy fillings, I think I'll like them with ice cream sandwiches, brioche are more likely to go soggy just after a few seconds of putting ice cream and soggy bread is one of my most disliked food items that I cannot imagine eating bread sauce; sorry if I offended anyone. 


I serve them as egg salad sandwiches to make a triple egg delight, perhaps the only thing left to be made with our chicken eggs is the mayonnaise for the egg salad but since they're not as fresh as ideal I didn't risk it. They were so delicious and even after 5 days, they were still soft and the texture hasn't changed.

Thank you very much and Happy Baking!  Job

PalwithnoovenP's picture
PalwithnoovenP

This is my take on Melon Pan, a Japanese bread. Several TFLers have already posted this here, here and even the admin himself here. It's an interesting bread and suits Japanese/Asian tastes well; a soft enriched dough is wrapped with a cookie (most likely a sugar cookie) dough, rolled in sugar then scored before proofing and baking. There is actually no melon flavor but it takes its name from its appearance which THEY say looks like a melon/cantaloupe. It is very similar to Mexican conchas and Chinese Pineapple buns. See its beauty and learn more in this video; the place and the bread looks very homey and comforting, perfect for an after school/work snack.

I first learned about this bread while watching the anime Shakugan no Shana when I was a sophomore in high school about 7 years ago, it was Shana's (the main character) weakness/favorite food.. At that time, I still do not have my baking passion but I just love to eat and learn food from around the world. I remembered it and wanted to give it a try but I know I can't because of the lack of equipment but I know I could make something with similar flavor by combining cookie and bread unconventionally.


I can already make some decent bread in my clay pot and I love cookie dough so bread and cookie dough it is. But soft bread with soft cookie dough is not very interesting so I though of crisping the bread up. It is really a small micro or even nano favor for my clay pot since it has turned many loaves and rolls into charcoal sticks and briquettes a couple of occasions before.

I used my go to sweet dough and kneaded it very well with the usual overnight fermentation. I divided it into 6 pieces about half the size of my enamorada last week. I pre-shaped them into rounds and rested them for 10 minutes. After 10 minutes, I shaped them into mini batards and proofed them in my oiled and lined mini llaneras.


They were then proofed for an hour until doubled, glazed with egg wash then baked in the preheated clay pot for 20 minutes.


I know you want to see my clay pot and set-up so here it is. The interior just after baking with the rolls nicely browned in their llaneras.


Traditionally, the cookie part of the melon pan has no add-ins but I really love chocolate chip cookie so that's what I used. You could use any EDIBLE cookie dough; I've heard many unfortunate incidents of eating raw cookie dough, homemade or commercial so eat at your own risk. I forgot my cookie dough outside the fridge for 2 hours at a very warm day that's why all the chocolate chips are melted when I stirred it staining the whole dough so no brown dough studded with choc chips. It looks like bean paste! But trust me, it's really a decadent cookie dough.


You could definitely tell the crispness of the bottom and the sides of the roll in this photo, the crust has a nutty toasty flavor. The crumbs is fluffy, buttery and not so sweet. The cookie dough is addictive! I've already eaten a cup before stuffing the rolls; it's rich, buttery, sweet, chocolaty and just so delicious. The roll balances the cookie dough flavor and they go really well with milk or coffee. I went with milk because I think it is a cookie's or even cookie dough's best friend. This will really bring the child out in anyone it is served.


I've thought of just slathering the cookie dough on top but I realized I won't be able to put as much cookie dough as I want to so I just split my rolls in half and stuffed giant gobs of cookie dough. That's where the name came from: Soft cookie dough between crispy bread which is the inverse of melon pan's soft bread underneath crispy cookie. Still if I have done it as originally planned it will still be reversed; soft cookie dough on top of crispy bread!

I hope you enjoyed this one. Thank you very much!

Job

PalwithnoovenP's picture
PalwithnoovenP

This is my version of Spanish bread, a popular local bread that almost every corner bakery has. A TFLer already posted this. Despite the name, I really don't know if it is Spanish in origin or if it has anything to do with Spanish cuisine; I read it was called as such because it was the Spaniards who taught us to make bread.


It is basically a lightly enriched roll with a "buttery" filling made from sugar, margarine and bread crumbs. Before baking it is rolled in bread crumbs for that rustic homey appearance. It is one of my most common after school snacks when I was a child, I often pair it with cola, iced tea or iced coffee. This bread really has a nostalgic charm and most of my generation and those older have fond memories with it as snack options were limited back in the day.


Now that I'm older, I decided to make a more "mature" and better tasting version of this bread. I used my favorite dough with and filled it with butter and sugar flavored with vanilla and rum. The flavors of this bread remind me of a sultry lover (and to keep the Spanish theme also) so I am calling this bread Enamorada.

I used my favorite dough for sweet breads. I kneaded it very well until the gluten is well developed which took 50 minutes by hand. After a 1 hour rest, I divided it into 6 large pieces and into the fridge it went until morning. The overnight fermentation made it really fragrant.


Each dough piece was rolled flat and the butter filling was spread before rolling like a spring roll. I didn't fold the sides all the way to the center that's why they had a funny shape. I allowed them to proof in my llaneras until doubled.


I glazed them with egg and milk before they went to my pre-heated clay pot over a wood fire for 20 minutes. I put too much glaze in some that burnt on the surface for some rolls. I was very happy when I opened my clay pot because they look like they're baked in an oven except for those little burns at the bottom, a bit more experiment with the timing and I feel I'll be a step closer to "oven baked" rolls.

Although I call them rolls, they are very large almost the size of a mini loaf. You can see it's as big as my hand. 


Here is the bottom of the roll. It's not burnt, just toasted and a little crispy.


The crust readily flakes in some areas. We really loved it.


The rolls are soft and crispy with a paper thin top crust and a light feathery crumb. The filling is not too sweet and full of character and richness (not just one dimensional sugar and butter) almost like a hard sauce. The bread and the filling complements each other very well.


Oh! A chunk of filling hiding in the corner! Highly addictive!


Serve it with black coffee or even espresso which I think is a must for a perfect snack! Thank you very much!

Job


PalwithnoovenP's picture
PalwithnoovenP

This is my first bake for 2016 and it is my most outrageous bake to date!


Yaksik (藥食/약식) is a traditional Korean sweet dish made by steaming glutinous rice, honey, nuts and dried fruits. Yak (藥)  in Korean means medicine and Sik (食) means food so yaksik literally means medicinal food. Honey has been regarded for a long time as medicinal and from my research it is the reason why yaksik was called yaksik. Yaksik is usually seasoned with honey, brown sugar, and soy sauce further augmented by cinnamon and sesame oil; those flavors are the main inspiration of this bread. I don't have the "standard" yaksik mix of jujubes, pine nuts and chestnuts but I have golden raisins so that's what I used here as I think any dried fruit will do; the only important thing is there are some.


This is the glorious Yaksik seasoning sauce made with dark brown sugar, soy sauce, honey, cinnamon, sesame oil and cinnamon. It's very fragrant and enticing but don't try to taste it in its pure state as it is so intense that it might make you throw up like what almost happened to me!


This is the finished dough with the raisins already incorporated. I use strong flour because of all that gluten weakening sugars and used more yeast because I don't have osmotolerant yeast which is preferable for high sugar doughs. This is still the old me, baking without measuring. I planned a bulk rise at room temperature for an hour before it goes to the fridge but when I checked it, it hasn't grown so I let it go for another hour and when I checked again there is hardly any growth! Oh no! Various thoughts ran through my mind; Have I killed the yeast with the cinnamon and soy sauce? Is the amount of yeast I added too little and all of the sugars are slowing to the point that it's dead? I remember that the night is much colder than the nights I made bread before, I asked Siri about the temperature and she said it's 24°C. 24°C is considered (very) cold where I live so maybe it's the reason why the dough is slow to rise so instead of putting it in the fridge I left in outside near my bed for the bulk fermentation.


I was greeted by this beauty this (notice the difference in the light?) morning! She's alive! All those sugar, soy sauce and cinnamon did no harm to her!

 
This is my gift to myself for this year's baking, a pullman pan! For us with no ovens this is our best friend! For bread to be cooked evenly without an oven, I found out over the years that conduction is the best heat transfer method for even browning and cooking, convection and radiation are just to uneven and I always end up with an almost burnt bottom and a pale top. With a pullman pan, there is something that will support the structure of loaf  and regulate intense temperatures while cooking and you can turn the bread so all sides get a chance to face the heat source from the bottom. The result is an evenly browned and cooked loaf; still, more work and not as even as an oven does but a million times better that what I achieved before. I baked this in a frying pan over a wood fire because the pullman pan is too large for my clay pot.


The dough rose nicely in the pan indicating good gluten development, I compensated for the high amount of sugar by a lot of kneading and strong flour. I followed txfarmer's advice of letting the dough proof just 80% of the pullman pan for a perfect height with round corners of the finished loaf. Being high in sugar, the bread stuck on the lid of the pullman pan when it finished cooking despite a good amount of oil so the top crust was ripped but it's still pretty for us. Likewise the bottom crust stuck to the parchment paper and I have no choice but to peel it off. It is enough to be thankful that bread was not burnt since it's very easy to burn it. Those marks at the top are from the cooling rack.


It has a very interesting flavor, very different from the pure seasoning sauce. Coming out from the pan the aroma of peanut butter wafted in the air with hints of chocolate and cinnamon. The bread was not very sweet but has a strong flavor of molasses and a touch of honey. There is a slight saltiness with a savory note for you to know it's something different but not enough to reveal there's soy sauce in it. The juicy raisins complemented the other flavors well especially the cinnamon flavor that comes through last in the flavor profile, not that strong cinnamon flavor that you will think it's "cinnamon raisin bread" but just enough for a sense of familiarity and fragrance in this entirely unconventional treat. Definitely not a flavor for everyday snacking for me but nice to have to shake up the palate once in while!


The crust is very thin, soft and delicate. The crumb is very soft that it's very difficult to slice, it's easier to pull a chunk off the loaf or pull shreds to eat. It's like eating an intensely flavored cloud.


The color is not as intense as a real yaksik because the ratio of the seasoning sauce to the grain is lower but it's still there. For the record, I still haven't made or even tasted an authentic yaksik made with glutinous rice. I think a more robust whole wheat will stand up and complement more all the intense flavors of this bread. I will use more honey and less or even completely leave brown sugar out next time because honey should be the star sweetener as it was the reason why yaksik was called yaksik. Finally I will try to complete the traditional add-ins pine nuts, chestnuts and jujubes next time.

I wish you could try it! It goes very well with tea! Wait! Why is there always tea in the photos? Well, it's a preview for my next post that's still in theory. I hope you enjoyed this post, until next time!

Thank you very much!

Job


PalwithnoovenP's picture
PalwithnoovenP

In my last post, my writing in English was complimented by some TFLers. Since this is my last post in the last day of the year (in a few minutes it will be already 2016 here), I will make this special by writing in my first language (We are a former Spanish colony and although we don't speak Spanish, we retained some of their words. If you speak Spanish, you may find similar words with different spelling but the same meaning), it has also many pictures because I also want to show a way of life here. Most words and phrases do not have a direct English translation, there is always something lost in translation so our language is one of the least accurately translated by google translate but don’t worry, I will provide translations. In my country, most are bilingual and we often change languages not only mid sentence sometimes even alternately by word or phrase, we also often conjugate English verbs with our own conjugations that even include “verbing” of nouns. As a result (in my opinion) one never really becomes proficient in any of the languages; in English, often lacking appropriate vocabulary or not being able to utter their speech smoothly and in our language,using wrong verb conjugations and noun forms. This is my way of maintaining my fluency in both languages and to let other people hear our beautiful language.


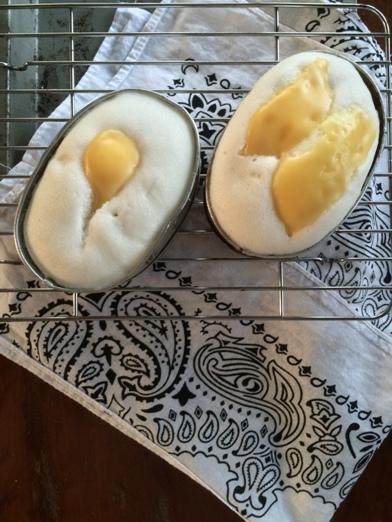
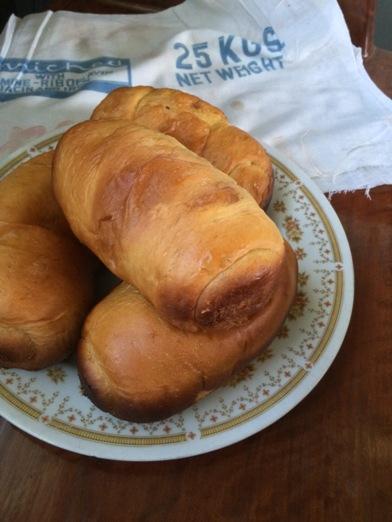
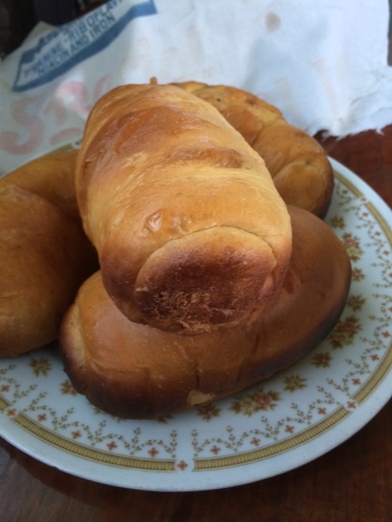
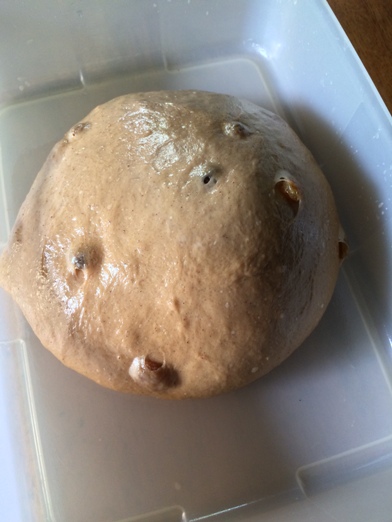
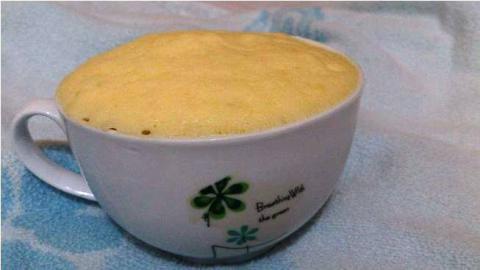
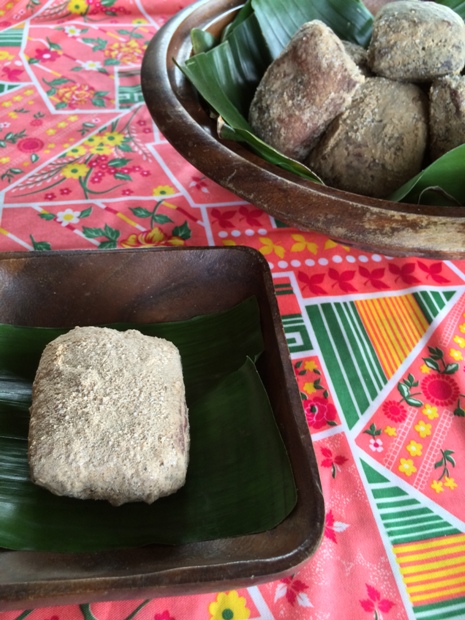
Ang tinapay na ito ay hango mula sa isang kakanin mula sa timog na bahagi ng aming bansa. Ang karamihan ng mga naninirahan dito ay mga Muslim na hindi nasakop ng mga dayuhan kaya nanatili ang kanilang relihiyon at natatanging kultura at mga pagkain. Gawa mula sa niyog,asukal at giniling na bigas; ang kakaning ito ay kadalasang inihahain lamang tuwing my kasalan at sa mga dugong bughaw. Ito ay tinawag kong Dayang dayang kasunod ng pangalan ng pinakatanyag na prinsesa mula sa lugar.

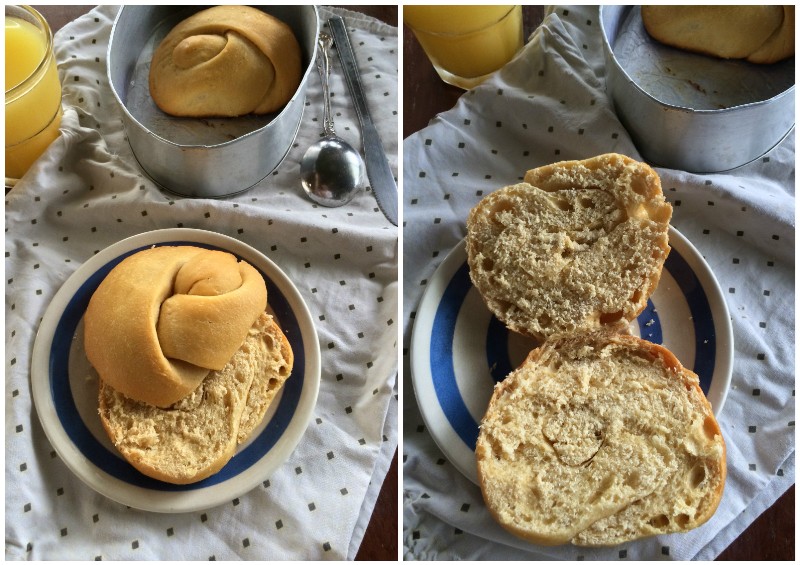
This bread was inspired by a delicacy from the southern part of our country. Most of the population there is predominantly Muslim who resisted colonization that’s why they preserved their religion and unique culture and cuisine. Made from coconut, sugar and ground rice, this delicacy is often only served in weddings or to Royal bloods. I am calling this Dayang dayang in honor of the famous princess from the island.


Marami kaming niyog sa aming bakuran at kailan lang ay pinapitas ng aking ama ang mga bunga nito. Marami kaming nakuhang bunga, parehong may buko at niyog. Para sa tinapay na ito, niyog ang aming ginamit. Kinudkod ito ng aking ama at mula rito ay ginawa niya ang isa sa pinakasikat niyang panghimagas. Maaring pamilyar kayo sa di-kuryenteng pangkudkod ng niyog ngunit para sa gamit na ito, ang pakamay na pagkukudkod lamang ang natatanging paraan para sa tamang lasa at linamnam. Ang mga niyog naman na hindi na maganda o masyadong nang matigas ay hindi masasayang dahil ito ay magandang pakain para sa mga manok.

We have many coconut trees in our yard and just recently my dad had their fruits picked. We got many coconuts, young and mature alike. For this bread, we used the mature coconut. My dad grated it and from it, he made one of his famous sweets. Maybe you are familiar with the electric coconut grater but for this application hand grating is the only option to achieve the right taste. Those coconuts that are bad or too hard won't go to waste because they are excellent chicken feed.


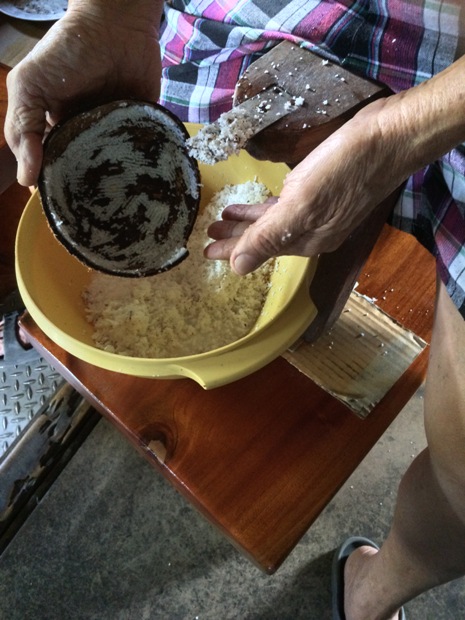
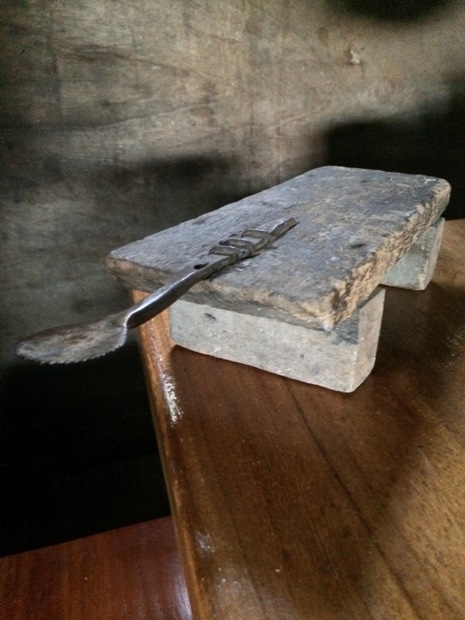
Ito ang aming kudkuran na bago. May paa na ito at mataas na ngunit dahil matangkad ang daddy ko, ipinapatong pa rin niya ito sa mas mataas na upuan para hindi siya mahirapan ‘pag nagkukudkod.

This is our new coconut grater. It has legs already and made taller than our previous one but because my dad is tall, he still puts it on a higher chair so it won’t be difficult for him while grating.


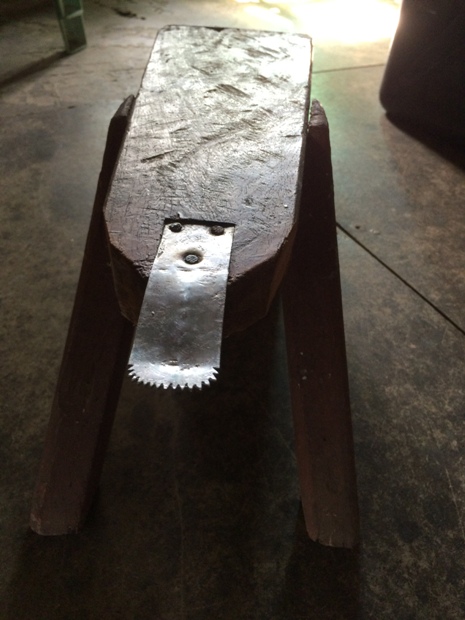
Ito naman ang aming lumang kukudkuran. Mula nang magkaisip ako, ito na ang ginagamit ng aking ama kapag nagkukudkod siya ng niyog at sigurado akong mas matanda pa ito sa akin. Pinalitan na lang ito ng bago mga ilang taon pa lang ang nakararaan. Di gaya ng bago naming kukudkuran, mababa ito kaya mas mahirap gamitin at sa hagdan ito  inilalagay para magamit ito ng maayos.

This is our old coconut grater. Ever since I became aware of this world, this is already what my dad is using when he is grating coconuts and I’m sure it is older than me. It was just replaced a few years ago. Unlike our new grater, it is low that’s why it is more difficult to use; it is used at the stairs to facilitate proper usage


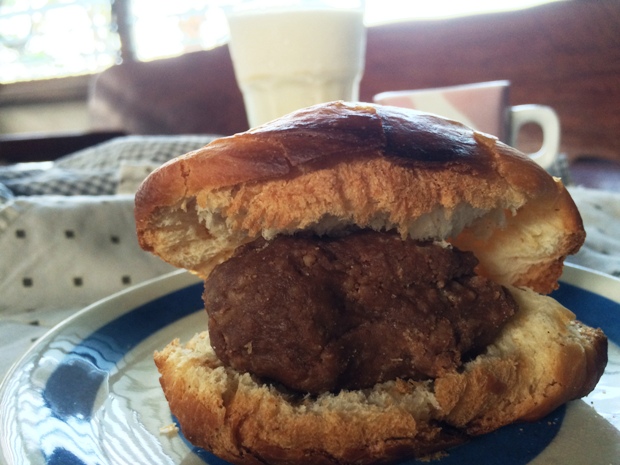
Upang kumpletuhin ang tinapay na ito gaya rin ng nasabing kakanin, kailangan natin itong budburan ng  pulbos para sa kakaibang lasa at texture. Ang ginamit ko rito ay isang tustadong keyk na tinusta ko pa sa kawali para lalong lumutong at tsaka ko dinikdik sa almires.hanggang maging pino. Naaalala ko ang almires na batong ito na noong hindi pa uso rito ang arinang bigas, ay iginiwa ako ni daddy rito. Mano mano niyang dinikdik ang bigas para sa akin dahil kailangan ko ito para sa isang proyekto sa paaralan. Tulad ng kudkuran ang almires na ito ay mas matanda rin sa akin.
 
To complete this bread like the said delicacy we need some sort of a powder for a unique taste and texture. To make it, I used a toasted sponge cake from the store that I toasted further in a skillet to make it crisper then I pounded it in a mortar and pestle until fine. I remember this stone mortar and pestle; back when rice flour was still unheard of in our area, dad made some using it. He manually pounded some rice into flour for me because I need it for a school project. Like the coconut grater, this mortar and pestle is older than me.


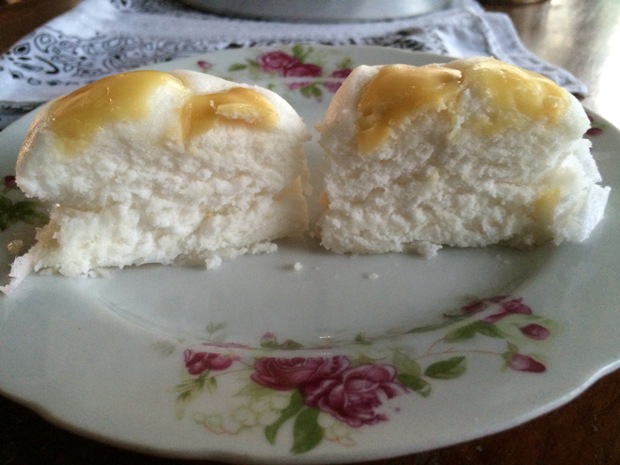
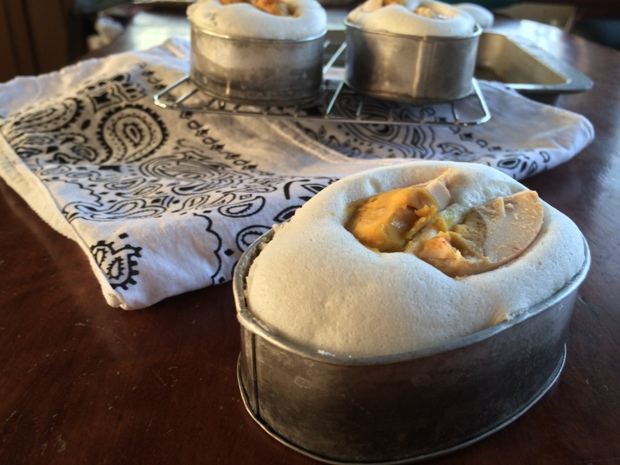
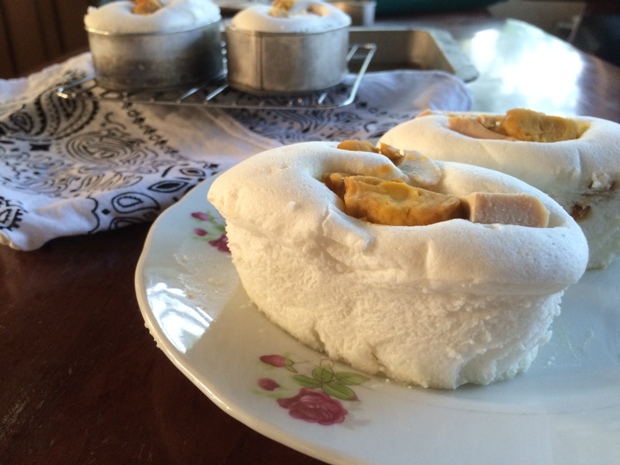
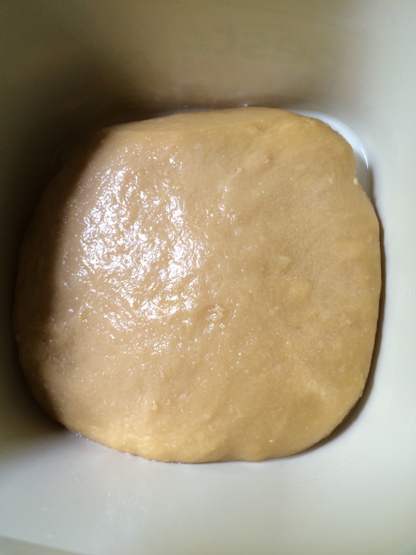
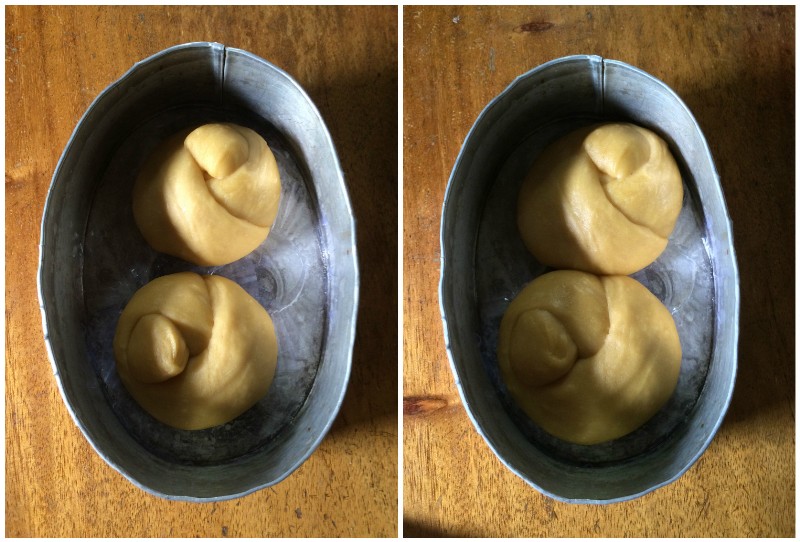
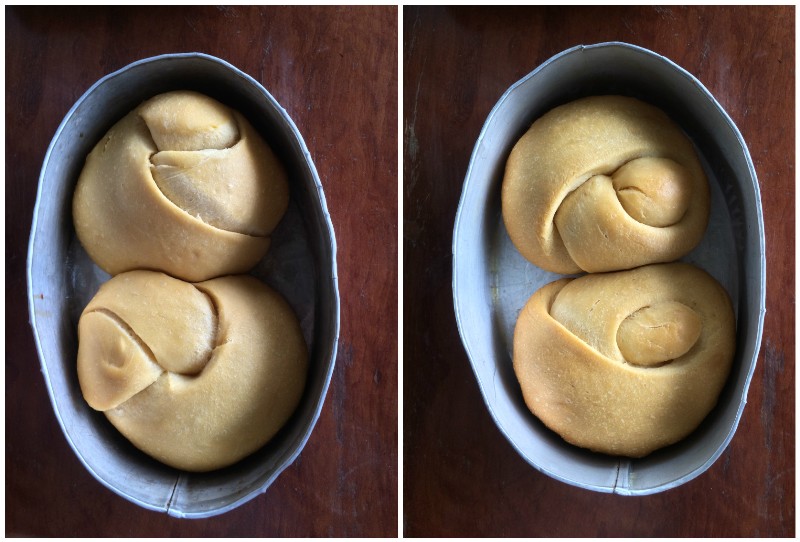
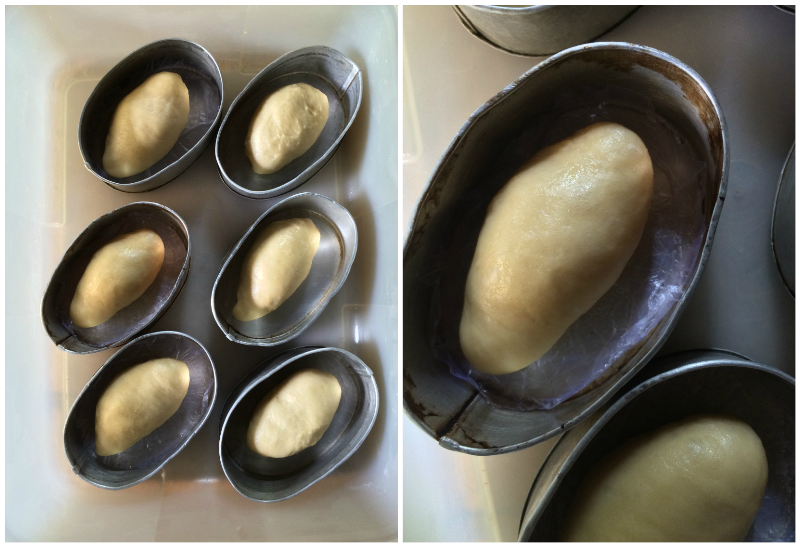
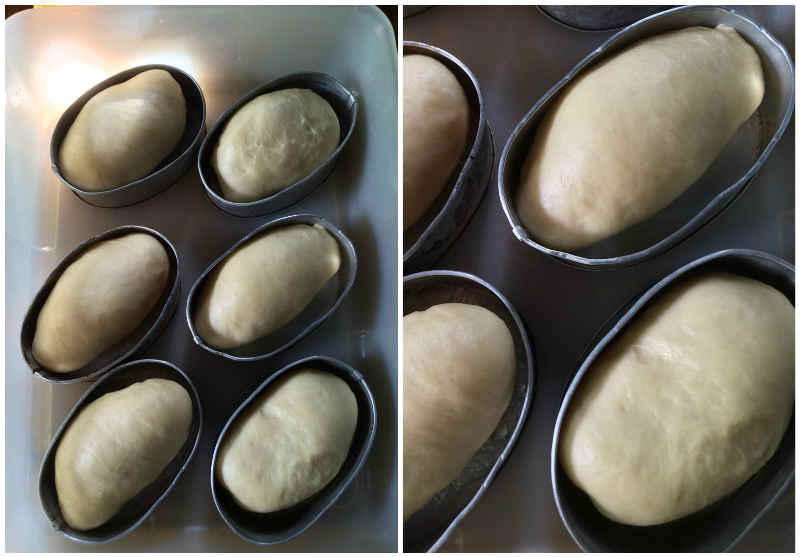
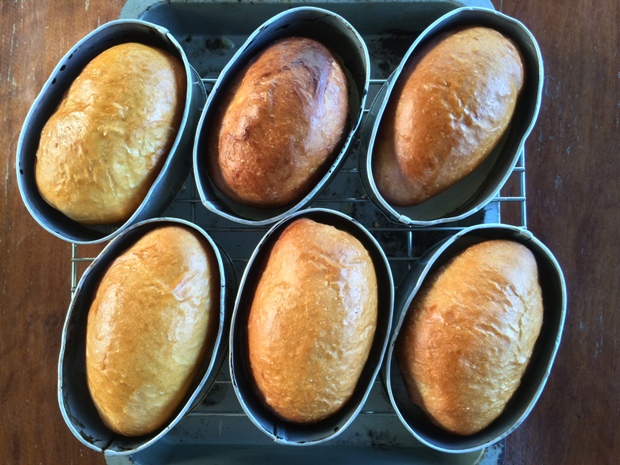
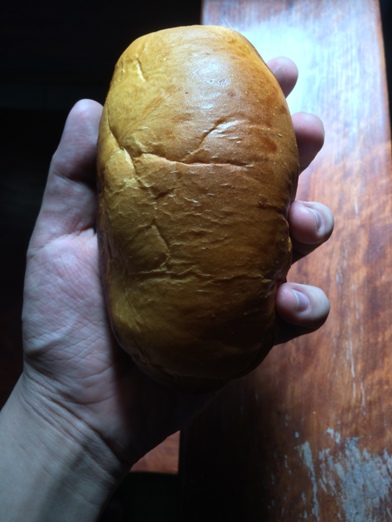
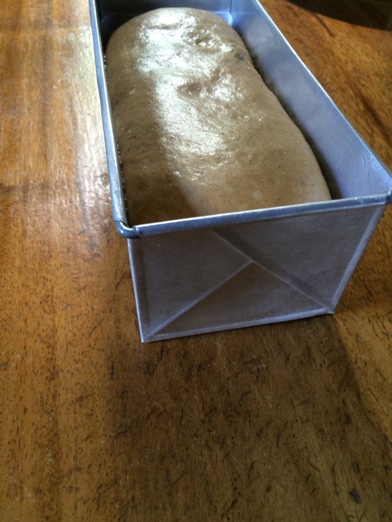
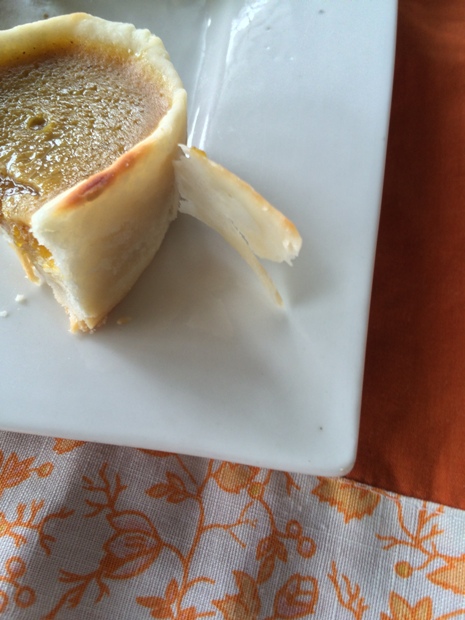
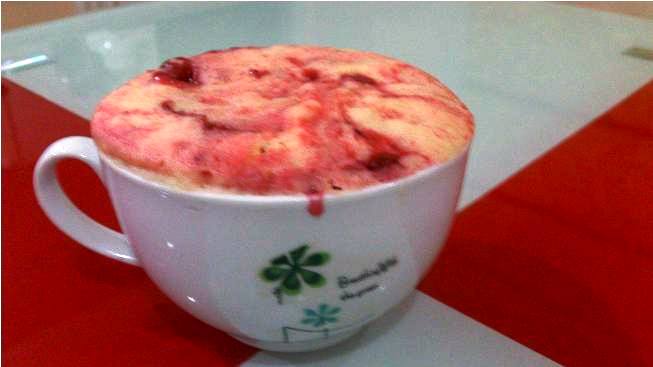
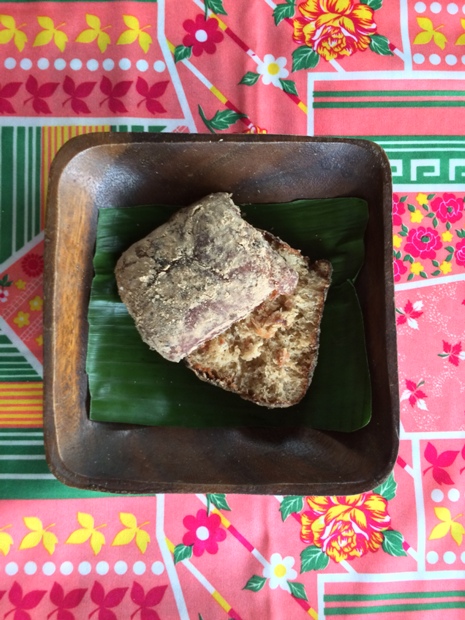
Ang tinapay na ito ay tunay na kolaborasyon namin ng aking ama. Siya ang gumawa ng niyog na pangunahing pagmumulan ng lasa at ako naman ang gumawa ng mismong tinapay. Matapos mamasa, ang niyog ay ihahalo na sa pamamagitan ng maingat na pagtutupi. Matapos itong paalsahin nang magdamag sa ref, ito ay tinilad-tilad ko sa mga parisukat na piraso, pinaalsa ko itong muli ng apatnapung minuto. Iprinito ko ito sa kumukulong mantika hanggang pumula. Matapos itong hanguin ay patutuluin ang mantika ng ilang sandali at dali-daling pagugulungin sa pinulbos na tustadong keyk.

This bread is really a collaborative effort between me and my dad. He is the one who made the grated coconut sweet which will be the primary flavor source of the bread and I am the one who actually made the bread. After it was kneaded, the coconut was blended through a series of folds then it went into the fridge for overnight bulk fermentation. Next day, I cut it into square pieces and fried it in hot oil until golden then they were allowed to drain for a few moments then immediately rolled in the cake crumbs.


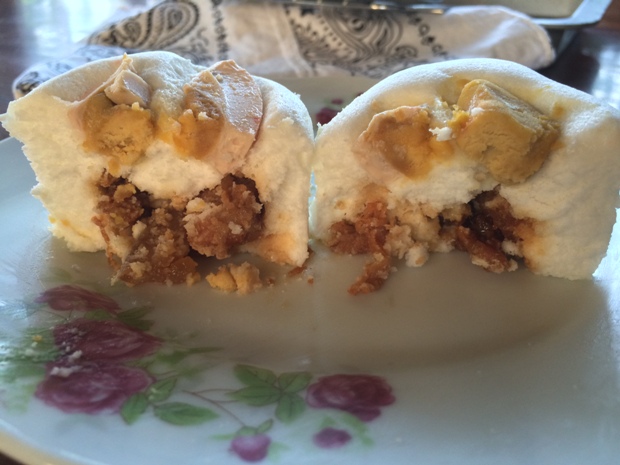
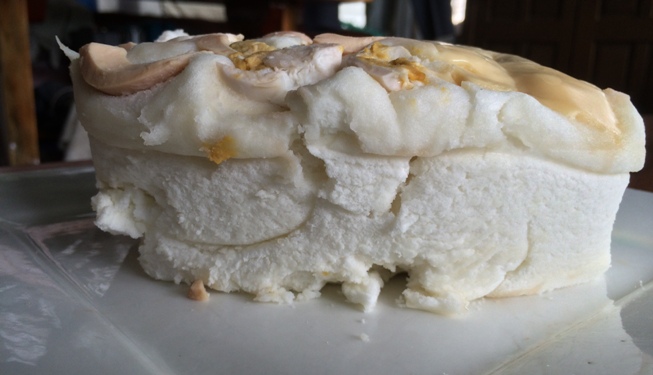
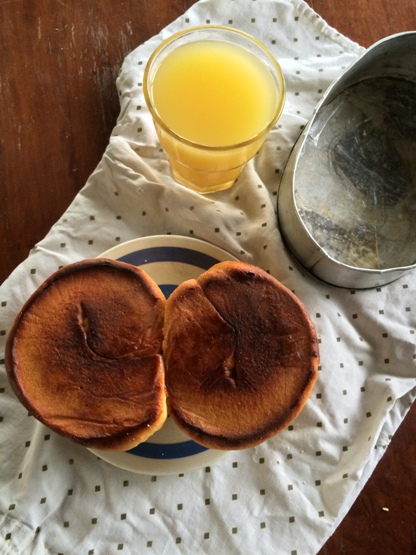
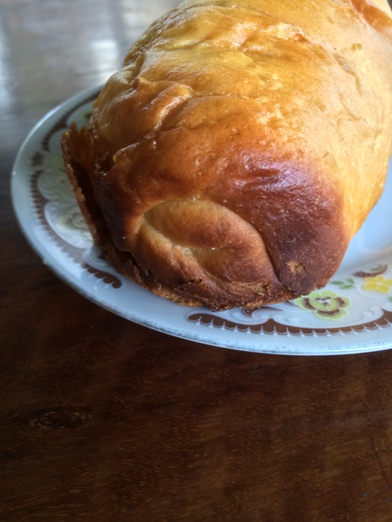
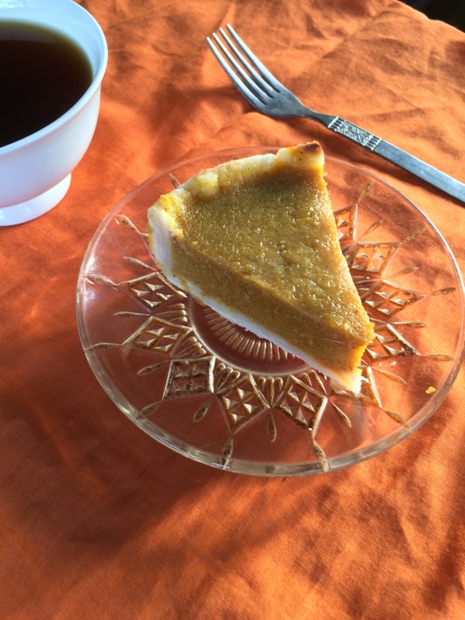
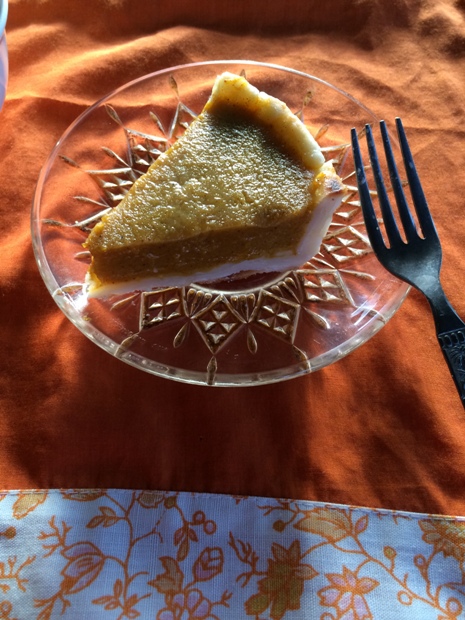
Ang tinapay ay malutong sa labas at sa loob ito’y malambot at hindi puro hangin at may sapat na kunat para may kasiya-siyang manguya ang kakain at ang tinustang mugmog ng keyk ay may kaaya-ayang gaspang. Ang lasa ng niyog ay nangingibabaw at bagay na bagay sa tustadong lasa ng pinulbos na keyk.

The bread is crispy on the outside and soft and substantial inside with a nice springy texture that’s enjoyable to chew and the toasted cake crumbs provide a nice gritty interesting texture. The coconut flavor really comes through and goes well with the toasty flavor of the cake
crumbs.


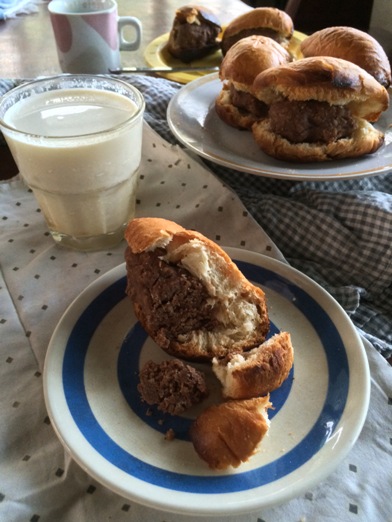
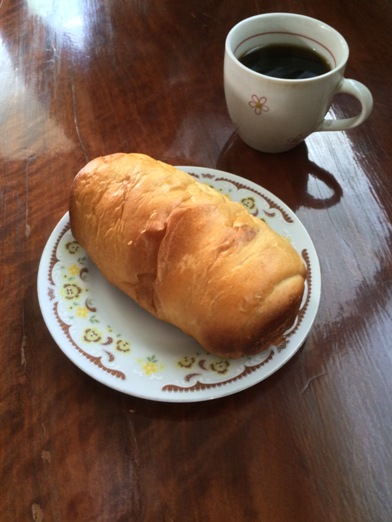
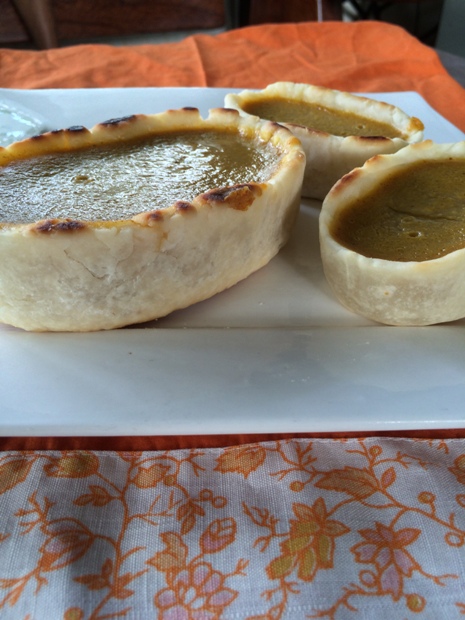
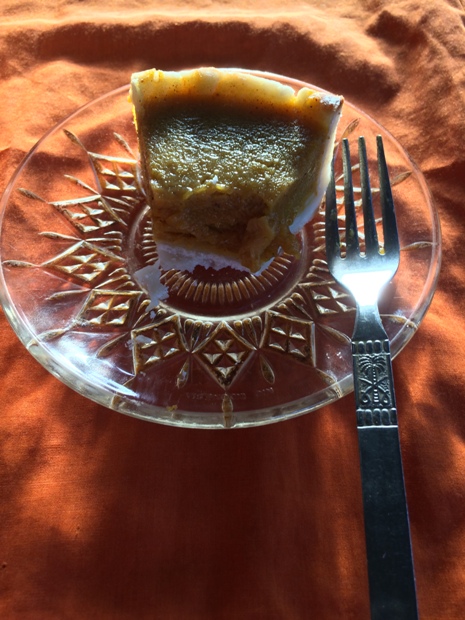
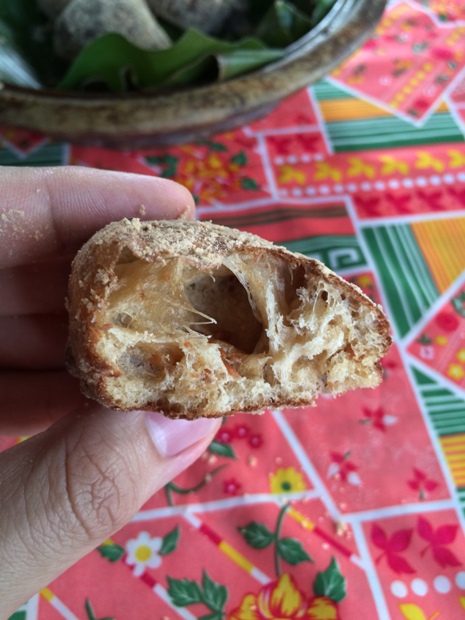
Nang malapit ko nang maubos ang isang piraso, nagulat ako sa malaking butas na tumambad sa akin. Katulad ito ng mga butas sa lean hearth breads. Ano kaya ang naging dahilan nito? Tunay itong kakaiba para sa isang tinapay na may masang minasang mabuti.

As I was about to finish one, I was surprised as a large hole appeared after I took a bite. It's like the holes in the crumb of a lean hearth loaf. What maybe the reason for this? It is really strange for a bread with an intensively kneaded dough.


Short Lesson:

Tinapay = Bread
Trigo = Wheat
Harina/Arina = Flour
Tubig = Water
Asin = Salt
Lebadura = Yeast

Wow! My brain just had a tough workout but it's really worth it! Let me just share my story of languages. I am already a fluent speaker of two languages and though not as fluent as my mother, I could also speak her language as my third language that I can hold a conversation for hours. In high school I considered studying Japanese but was scared by their different word order of S-O-V so I decided against it, now I’m older I noticed that my first language has a very unusual word order. English has S-V-O, ours had V-S-O; realizing that I became fluent in English which has a very different grammar, I now have no fear in studying another language; with time, dedication and passion, I can become fluent in it. Just last month, I studied French to take a break from Mandarin because characters just overwhelmed me at that time and I am enjoying my French study. To kill time, I study languages so instead of clash of clans or other game apps, you will find pleco and duolingo in my phone. Having studied several languages, it just fascinates me about the different aspects of a language and which is the most difficult for learners, for example: we have consistent pronunciation but foreigners find case marking, linkers, verb inflections, and word order very difficult; I could already read Cyrillic but can’t grasp Russian grammar; I could remember most of French verb endings in writing but pronunciation is the most difficult part; and speaking is the easiest part of Mandarin but do not talk about reading and writing! With this I appreciate differences even more and I am more fascinated in the world.

Now, I’m starting to feel my “Mandarin fire” burning again and I will go back studying it in the New Year but I will not leave my French study either! As I was studying French for a month I learnt better through French chansons and I recently discovered great francophone artists like Mireille Matthieu, Françoise Hardy, Joe Dassin and Christophe; I can't stop listening to their beautiful songs. I hope that I’ll be fluent in French and Mandarin by my early or mid thirties just like how ten years of English study made me fluent in it.


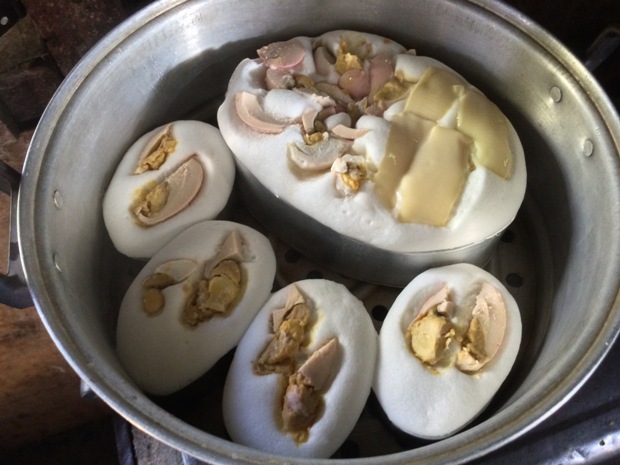
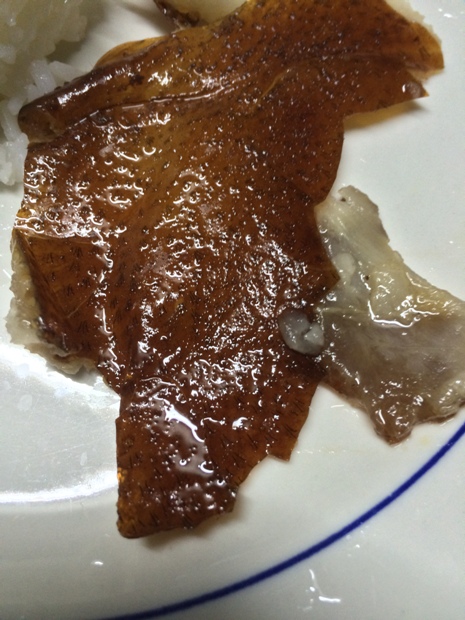
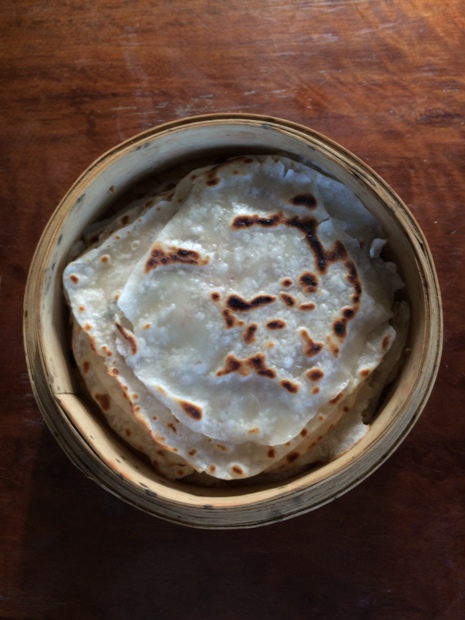
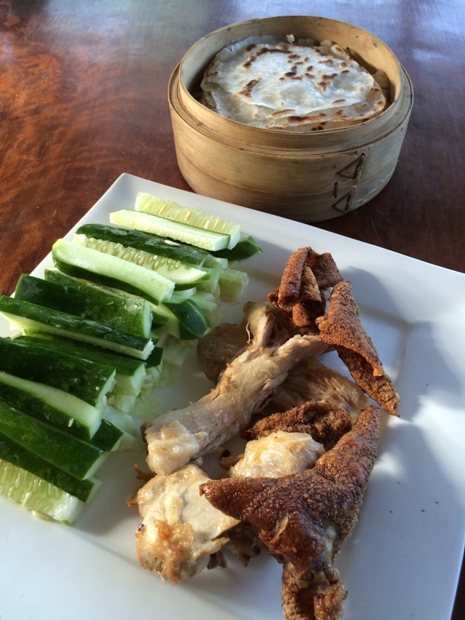
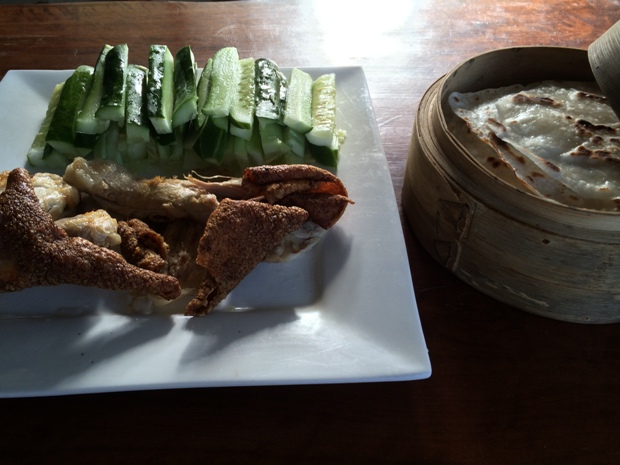
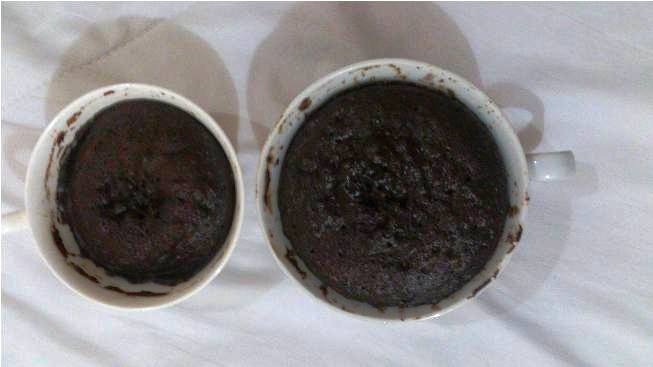
Remember the roasted piglet last week? We stretched for a whole week and made some dishes with it so aside from the wrap we also made some stew and soup.


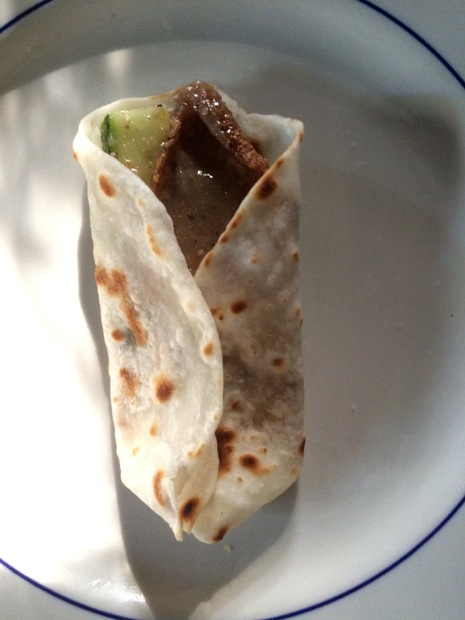
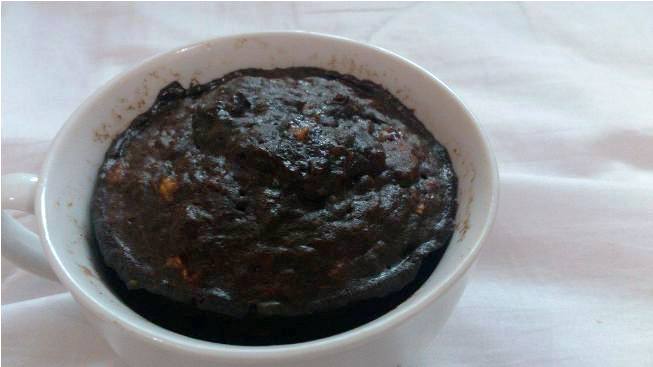
Lechon Paksiw is the classic way to give life to leftover lechon when the skin is not crispy anymore. Stewing it make it gelatinous and tender that it melts in the mouth. We used the tail and trotter for that sticky sauce quality.


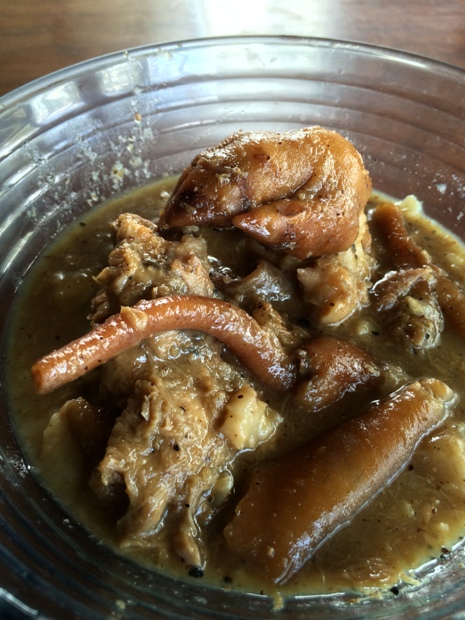
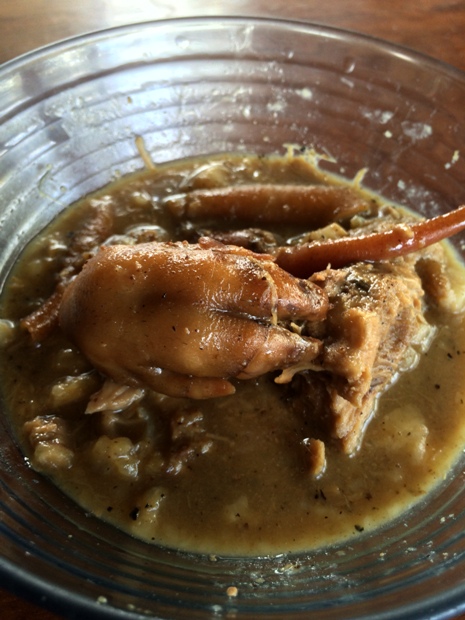
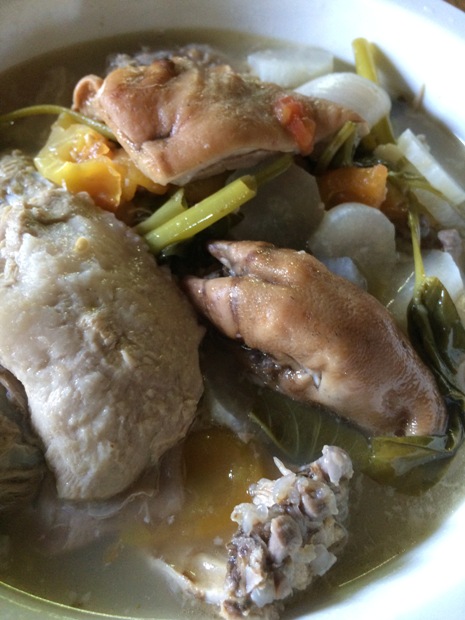
Sinigang na Lechon is a new dish for leftover lechon. It is a clear soup with vegetables flavored with tamarind. We used the ribs and trotter for a rich flavored and full bodied soup.


Someone also gave us large prawns. Simply boiled and eaten with vinegar, they were so delicious!


We really had a great year and we thank God for it! I hope it will be the same or even better for next year!

Thank you very much and Happy New Year!


From Pochi, Bimbo, and Fedra: Happy New Year!

PalwithnoovenP's picture
PalwithnoovenP

Yesterday was one of the happiest days of my life! By noon, we went to an unassuming neighborhood to have the best gastronomic experience to date! There, waiting for us is a whole roast pork for us to take home; golden and crackling!


This roast pork was already planned by my dad months ago as a special treat for the whole family. Roast pork is called Lechon/Litson here and is considered a national dish here. It is a popular status symbol back then and often the importance of the occasion is measured by its presence. Though full of fat and cholesterol, it was so delicious and having it once in a while is a real treat. Most lechon came from commercial farms who employed vitamins and feeds for the pigs and large companies roast thousands using modern machinery. It's our first time to have a pork roasted for ourselves; we only have them in parties/dinners/celebrations of friends and relatives and occasionally by the kilo from the market. Dad just learned the best kept secret of roast pork so we tried it for first our roast ever.

Organic lechon is still not widely known here and only a few gets to enjoy its exceptional flavor. By late August, dad talked to a friend who is a pig raiser who is expecting a litter of piglets. We get to choose first the piglet that we want then every month we pay for his labor and the food for the piglet; we basically sponsor the piglet's needs for its entire life. The pig's food is very cheap since it's organic; just rice bran, vegetables, tender branches and leaves and fruits; it makes them very easy to grow but it also makes them slow to gain size. It's simple diet of plants is characteristic of its breed which came from the wild mountain hogs of the country. It is our native pig and very different from the commercial breeds, they are black, smaller and some have tusks making them resemble warthogs and wild boars.

Four months later when the piglet was already 15 kilos (this size could easily feed 10 people and there were only three of us eating it!), we made a trip to the Lechonero/Litsonero that my dad's friend knew and we negotiated the price for roasting the piglet. We made a good compromise since they will take care of all the process from slaughter to roasting. We really made a good choice, this man has enjoyed an excellent reputation for a good number of years, even decades!

This lechon is really artisanal from piglet selection to its diet to the roasting process. We patiently waited for four months so we entrusted this to only the best! After it was cleaned, it was skewered into a bamboo pole and  aromatic herbs where stuffed into the cavity then rubbed with a secret blend of spices. It was then roasted, manually hand turned for two hours over coals until cooked and crisp. This is the secret to the proper taste of lechon, how lechon should taste! 


We got home with the pig still hot from the fresh roast and we ripped it apart with our bare hands!  We first went for the crispy skin, at the slightest tap of the fingers it splintered and shattered into crispy sheets! Oh my, it's pure bliss! The whole family is partaking it without hesitation, fat drips from our lips and fingers to our clothes but we don't care!

This organic lechon (pig) really puts other lechon to shame! What I enjoyed back then seems like cardboard to me now. Daddy really knows best. The skin is super crispy and the meat is firm but tender and the fat is very thin, flavorful and meltingly tender that you will not think twice to eat it even if you know it's fat! It's good that the lechonero seasoned the pork well but what really sets it apart is intense porky flavor that you cannot find in other pigs; hot, cold, or room temperature, that flavor is present even in the deepest parts of the meat where virtually no seasoning could reach. The innards were also great, cooked simply in garlic and vinegar and of course; the liver sauce made from the pig's own liver was exceptional!

We already had the best part, when it was freshly roasted and the skin was very crisp we ate it on it's own and stuffed ourselves to capacity to take advantage of its best quality and our excitement and to savor its pure flavor without the sauce, then at night we ate it with rice and the sauce to stretch it a little since we're already satisfied with the earlier binge! Since it is large and we cannot finish it on the same day, we froze left overs to be eaten for the next couple of days with various dishes to stem from it from sandwiches to stew to soup. 


It's the best I've had and what makes it even more special is I had it out of my Father's love.


Weeks prior to the roast feast, I have already settled that I will serve the lechon in a different way than the usual with rice since this was special by serving it a la Peking Duck! Crispy skin is one of the main features of Peking duck and lechon boasts it too so I think it's a great way to highlight the crispy skin!

I have never had a Peking duck but I saw them served with thin pancakes, cucumbers, scallions and sweet bean sauce. I've also seen some served with steamed buns but I think the thin pancakes will complement the texture and flavor better than steamed buns. After some search, I've found a recipe for them with a very interesting technique. Sandwiches of dough are rolled flat, dry-fried, separated into halves then steamed.


They have to be really thin to have the right texture, chewy yet delicate and this can only be achieved by that technique. Luckily, I've managed to make them very thin even without a proper rolling pin, I just used a steel pipe that is not even perfectly flat. I hope I could improve them more next time. Still not bad, it's thin enough for light to pass through.


How I wish that I served them yesterday when the skin was perfectly crisp but I really don't have the energy to make bread following a sleepless night because of a bad acid reflux attack on Monday night. Today, the skin is not crispy anymore so I fried it and voila! It's crisp again but different. It's close to a lecharon portmanteau of lechon and chicharon, fried pork rinds. I can't emphasize this enough but I think it's really best if we had eaten this yesterday but even though it tastes different, there's nothing to complain! I served it just with cucumber because I was skeptical about the scallions, I don't know if it will complement the lechon flavor.


Interactive dining  is one of my most anticipated parts of a meal, it just makes the experience more fun and I think is best while chatting with friends and family. Let me take you to one of the highlights of our lunch today!

Thank you very much!


Lay the pancake on a plate.


Put a piece of juicy meat with fat.


Add a piece of cucumber for that refreshing flavor and crunch.


Do not forget that crispy pork skin!


Drizzle a little of the mandatory liver sauce...


Roll and Enjoy!!!

PalwithnoovenP's picture
PalwithnoovenP

I made some boiled dumplings (jiaozi) the other day to expand my repertoire and just to try something new. They are rustic, comforting and a really nice alternative to buns, noodles and rice. Read here for more information and how to make them from scratch. Baozi and siumai are my favorite Chinese snacks and these are a new addition to those. I like their simplicity compared to steamed dumplings and pot sticker, drop the into boiling water and when they float they're done. Serve it with your favorite dipping sauce.


The dough before resting, very dry.

The dough is very simple with only three ingredients; flour, water and salt. As usual, I made these without a recipe and measurements. I just made a very dry dough and allowed it to rest for two hours. This resting is a crucial step for a proper dumpling dough, at first it looks very dry but after resting it will be a silky, smooth dough. It is easier to make dumplings with a drier dough so they can withstand boiling. For the filling, I just added stuff that we like.


After resting, it is kneaded some more and allowed to rest for a shorter time. It is then divided and rolled into sheets. I divided the dough into twenty pieces and rolled them five at a time and filled them immediately to avoid drying out. I made large three inch dumpling to cut down on prep and rolling time because I am the only one rolling, filling and cooking! Each dumpling wrapper must be rolled individually with thinner edges than the middle so when they are folded, the top pleats and bottom are somewhat of equal thickness. I made three different dumpling shapes to practice my pleating. This video presents eight beautiful techniques for wrapping dumplings.


After resting and second kneading, it's much softer, smoother and more manageable.

After a seven minute boil, they are ready. I served them on a very old plate. This is already my plate since I was five years old and I bet it's much older than me. The filling was meaty and flavorful and the dumpling skin was chewy yet delicate, silky and smooth. It's so delicious further complemented by the dipping sauce. If you make this, be sure to roll the wrappers thin enough and if you want to serve them in soup, go ahead! They will just be less delicate than wontons but they are a different beast and have their own charm.


I have more than enough wrappers for the filling so to avoid putting them in the fridge for later use, I turned them into noodles. I just cut them into half moons and boiled them. Oh my! This dumpling dough also make fine noodles. They're very delicious just with soy sauce without anymore accompaniments.


Thank you very much!

PalwithnoovenP's picture
PalwithnoovenP

I've never had a pumpkin pie in my entire life because pumpkins and/or squashes are just meant to be savory here. I can't imagine pumpkin as sweet before, then it became a trend to put it in desserts because of the flavor and health benefits; still haven't tasted a sweet with pumpkin. So, pumpkin is generally accepted now to be used in sweet and savory alike but the idea of pumpkin pie with spices (some even call for black pepper and coriander) is still perplexing because the use of spices with sweets is not much accepted, it sure tastes alien here!

Last week, there was a conversation about pumpkin pie on Dabrownman's blog and it really made me want to taste pumpkin pie. I like to taste one to know the reason why every American I knew love the taste of sweet pumpkin with spices in a pastry shell. For me as always there's no other way to taste it than to make it myself as soon as possible.

(This is long post with a ton of pictures because I'm so happy of what I've achieved)

This weekend, my cousin brought us half of the lovely pumpkin (I don't know if it's a pumpkin or squash; what I just know is when I became aware of this world is THIS is the pumpkin or squash that I knew but I'll call it pumpkin in this post) that they harvested weighing more than two kilos. I said to myself that maybe it's really meant and it's the right time for me to make some pumpkin pie.


This pumpkin pie was totally unplanned! I tried to get my palate accustomed first to sweet pumpkin by just dipping my toes in the water, pumpkin sweets with simple clean flavors. First, I thought of making a pumpkin flan but I saw some spices used in pumpkin pie in my bunch of things so my thoughts shifted to a crust less pumpkin pie. When I am to begin my mind was struck again that it won't work so I changed my mind again, I'll just make a pumpkin flavored custard tart. Then again I got really curious about the taste of a pumpkin pie and I got all the ingredients I frequently saw on pumpkin pie recipes so finally I've settled that I will give it a shot. Okay, I am ready to check the internet for an exact recipe but there was no connection! I'll just have to rely on my memory on what I've seen on that recipe. I remembered it has maple syrup, evaporated milk, cinnamon, nutmeg and ginger.


I really winged this pie, the filling and the crust! I don't have a recipe to follow and I don't have many of the required ingredients in the kitchen. Well, it's not a problem! I am the kind that doesn't hesitate to improvise or substitute.

* I don't have evaporated milk but I have condensed milk- reduce the sugar and add some water. Solved!

*No maple syrup but I have golden syrup and honey- use honey because it will complement the spices better. Solved!

*No ground ginger- use fresh ginger. Solved!

*No butter for the pie crust- use oil and a bit of technique. Solved!


I didn't measure anything too because that's my game, it's where I'm used to. I made four mini ones and one large pie in my llaneras which are flan molds. Unfortunately, my molds won't allow me to crimp the edges which is my favorite part of pie making and I'm so good at it! :P

For the crust, I've read before that oil pie crusts are not as flaky as butter ones so I tapped on my background in oriental pastries. The spiral pastry made with alternating layers of water dough and oil dough is super flaky without even a chunk of butter and works every time so that's what I used here. I made both doughs by adding water and oil little by little until they had the right consistency. 


For the filling I cut off a decent-sized chunk from the pumpkin, sliced it thinly and boiled it until very soft. I then mashed it by hand and added other ingredients with cinnamon being the backbone of the spice flavor. I tasted and tasted it before adding the eggs and made it overly sweet on purpose so when the eggs are added, the sweetness will be right. I also went heavy with the salt for a tremendous flavor boost. Not so fast! Before adding the eggs I saw it was too thin because of too much water added as compensation for the condensed milk, it was like soup! When the eggs are added it will be much much more fluid unlike the pumpkin filling I saw on videos so I made a brave move, I cooked the filling on the top of the stove sans œufs until thickened. When I tasted it, I liked the flavor much better than the uncooked one, more intense and slightly caramelized. Yesterday I remembered txfarmer's favorite pumpkin pie that I read long ago and decided to read it and I was shocked (I've already made and eaten the pie before I read it) that it also calls for heating the ingredients before filling the pie so maybe this is a technique to keep. When the mixture was cool, I then mixed in the eggs.


I suddenly had plan; instead of baking the unbaked dough filled with the filling in my clay pot over a wood fire, I will employ a different technique to test a theory. I will try to bake this in a frying pan on top of our gas stove! To ensure a crisp crust, I will bake it first without the filling utilizing conduction from the mold to cook the dough on the bottom then I will flip it so the radiant heat from the pan will cook the dough from the top so it's really dry and crisp; then to ensure a silky filling, I will bake it at a low temperature and since it is technically a custard or flan, it can be steamed too!


What sounds good in theory doesn't always go smoothly in practice. The dough is a bit difficult to conform to the shape of the mold especially with the large one, I really rolled it into an oval to minimize waste and luckily none was wasted. I intended to serve these as a late afternoon snack but since it was unplanned and I began very late, I had to rush it that resulted in some mishaps. I forgot to  prick the base of the crust and five minutes later they have all puffed up like a balloon so I pricked them with a fork as best as I can to keep them flat. When the crust was cooked I immediately put the filling in and pour water on the pan to steam it, again as an effort to serve it that afternoon so I forgot to shake and tap the pan to raise the air bubbles so they left a mark at the top. I quickly covered it with the lid too not remembering to put a cloth so condensation dripped on the pies and left white marks on the top and a crack on one. If those didn't happen then this pie would have a very smooth top and a more vibrant color. Alright, I learned my lesson! 


The crust was VERY flaky and crisp, this one even managed to keep the spiral pattern too! It may not look like it was because it's pale but it really is. The crust without any barrier from the filling is still crisp even after four days in the fridge! It also goes well with the filling, what more if it's a butter crust!


The custard was smooth and silky, no cracking or weeping. It didn't dome over like most "baked" pumpkin pies. Its texture inside is closer to the one posted by txfarmer. It was spicy, yes and I admit that I really like it as first time maker and eater and I understand now why Americans love it, personally I would love it more if it was more spiced. Now, why it lasted for four days? Because I'm the only one who ate it! People here can't get past the aromatic spices especially the ginger and said "If it was just pumpkin then it would have been delicious or I could have eaten it!" No problem! More treats for me!


It was so delicious but it can be made better. This will be my adjustments next time:

*Use a proper all butter crust- it's my favorite and has the best flavor.

*Add some alcohol- I think it will be really nice; rum, brandy or whiskey, maybe a splash of Kahlua or Tia Maria will be good too for some coffee undertones.

*Add some nuts- walnuts or pecans would be a nice contrast to the silky filling.

*Use brown sugar and/or molasses- I think it is the ultimate complement to the pumpkin and spices.

*Stick to the sweet spice quartet- I'm not a fan of ginger so I'll ditch it. I'll add cloves because that's what I like then use more nutmeg and less cinnamon. I'm sorry cinnamon, it's time for you to move aside and let nutmeg take center stage.

*Make two batches- one for my spice loving self and one for my pumpkin loving friends!


I would like to close this with a satisfying sweet meal. Thank you very much!


PalwithnoovenP's picture
PalwithnoovenP

I just saw this photos again while I was browsing my album in my phone and they were almost a year old! These are made during my stay at the dorm while having my practicum. They are so easy and fun to make so I thought I'd go post them!

In our house, we don't have a microwave so even if mug cakes are already trendy I still can't experiment on them until I lived in the dorm. The dorm is complete with appliances from a stick blender to a rice cooker to a coffee maker to a microwave! Perfect! People around me are asking where am I getting those fragrant freshly baked cakes without any oven in the dorm, and I say in the microwave that they just use to reheat their food; they were really surprised though it is already common. I think any recipe will work in a microwave though some recipes might have a different texture than when baked in the oven.

For quick breads, baking in the microwave is quick and instant gratification. Mix a small amount of ingredients right in the mug, pop in the microwave and in 2-3 minutes you'll have your treat ready. It is also excellent for portion control. Or if you're in a hurry put a full recipe in a large microwavable bowl/container and in more or less than 5 minutes you'll have a large cake for everyone, perfect for a casual get together.

Strawberry swirl Calamansi mug cake- yellow cake rippled with strawberry jam soaked in calamansi (local lime) syrup


Cooking time depends on the wattage of the microwave. See Gemma Stafford's guidelines for more details here, she really inspired me to try bold things in the microwave and I created my own recipes inspired by hers. Pictured at the top is a calamansi mug cake, yellow cake with the juice of a local lime which has a very distinct taste. I don't even know the wattage of the microwave at the dorm so I just cook in short increments until done. I also used my largest coffee mug which has a capacity of 1 1/4 standard cup.

Plantain-Chocolate mug cake with Pistachio ice cream


Gemma's Chocolate-Banana-Peanut Butter mug cake 


Always clean the sides of the mug before baking if you're giving these to someone for a better presentation. Also be careful with saucy cakes, for my FIRST try I made a chocolate pudding cake and it boiled over and I have to clean the whole microwave. I always give some to my dormmates so I befriended many of them (most are Koreans) and in return I always received something from them like...

Rice Cooker Cheescake with caramel topping


Purple Yam Ice cream Chocolate cake


Unsliced kimbap ~ Eat like ice cream!!!


I hope you like these too!


Thank you very much!


Pages

Subscribe to RSS - PalwithnoovenP's blog