The Fresh Loaf

A Community of Amateur Bakers and Artisan Bread Enthusiasts.

dmsnyder's blog

dmsnyder's picture
dmsnyder

Pane Tipo di Altamura

31 March, 2016

David Snyder


Back in 2011, several TFL bakers worked on trying to replicate Pane di Altamura at home. I participate with one bake (see: http://www.thefreshloaf.com/node/24139/pane-tipo-di-altamura-quotlocal-breadsquot), but did not work to refine it and have not baked this bread since. Abe's (A BakEr on TFL) recent efforts have inspired me to give this bread another go.

Since my prior attempt, I have had a little experience baking in a wood-fired oven, which is how Pane di Altamura is baked. I realize how different that oven is from my home electric oven. I have further amended Abe's amendment of the Italian DOP specification based on this experience. Most significantly, almost all instructions for baking this bread omit steaming the oven. My thinking is that, in a wood-fired oven, generally there are multiple loaves baking at once, and the water that evaporates from them, in effect, steams the oven without the addition of any water by the baker. This effect is much less with a single loaf in an electric oven. Therefore, I did steam my oven for the first part of the bake. That said, the formula and procedures I used are largely based on the information Abe kindly shared with us.


Total Dough

Wt. (g)

Baker's %

Semola Rimacinata (Fine Durum flour)

550

100

Water

330

60

Salt

10

1.8

Total

890

161.8


Biga Naturale

Wt. (g)

Baker's %

Semola Rimacinata (Fine Durum flour)

50

100

Water (80-90ºF)

30

60

Semola Rimacinata starter

20

40

Total

100

200

I already had a biga naturale from a previous bake in my refrigerator. So, the biga used in the Final Dough was fed three times with about 12 hours' fermentation of each build.

  1. Place the starter in a medium bowl.

  2. Add the water and mix until the starter is in pea-size pieces.

  3. Add the flour and mix until there is no dry flour and the biga feels like a bread dough.

  4. Place the biga in a clean bowl and cover tightly.

  5. Ferment for about 12 hours at 70-76ºF.

  6. Repeat twice more.


Final Dough

Wt. (g)

Baker's %

Semola Rimacinata (Fine Durum flour)

500

100

Water

300

60

Salt

10

2

Biga Naturale

100

20

Total

910

182

 Procedures

  1. Mix the flour and water well in a large bowl. (There should be no dry flour in the bowl.)

  2. Cover the bowl tightly and let it rest at room temperature for an hour.

  3. Add the salt and the biga to the bowl. Mix thoroughly using the French “pinch and fold” method.

  4. Knead in the bowl or on an un-floured board for about 10 minutes.

  5. Cover the dough and let it rest for 10 minutes.

  6. Knead for another 10 minutes.

  7. Transfer the dough to a clean bowl. Cover the bowl tightly.

  8. Ferment for 6 hours at 76ºF. (I used a Brød and Taylor Proofing Box set to 76ºF.) The dough should be expanded to double its original volume and feel soft and puffy.

  9. Transfer the dough to a board lightly dusted with durum flour and pre-shape as a boule.

  10. Pre-heat the oven to 500ºF with a baking stone and steaming apparatus in place.

  11. Place the boule on baker's linen and cover well. Let it rest for 30 minutes.

  12. Transfer the dough to the board and pre-shape as a bâtard, taking care to de-gas the dough as little as possible. (Note: Pane di Altamura is traditionally shaped as a boule. I elected to shape it as a long loaf. If shaped as a boule, the bake time should be increased, since the loaf would be thicker.)

  13. Place the bâtard on the baker's linen and cover well. Let it rest for another 30 minutes.

  14. Transfer the bâtard to the board. Gently stretch it by grasping the two long sides and pulling it into a flat oval.

  15. Using the sides of your two hands, make a wide groove down the long axis of the loaf. Then fold the loaf at the groove so that the upper half over-laps the lower half 3/4 of the way. Gently seal the seam between the upper and lower layers.

  16. Transfer the loaf to a peel.

  17. Turn the oven down to 450ºF, steam the oven and transfer the loaf to the baking stone.

  18. Bake with steam for 15 minutes.

  19. Remove the steam source from the oven. Turn the oven temperature down to 420ºF (or 400ºF convection bake).

  20. Bake for another 15-18 minutes. The loaf should be nicely browned. It should sound hollow when the bottom is thumped with a knuckle. The internal temperature should be at least 205ºF.

  21. Transfer the loaf to a cooling rack and cool thoroughly before slicing.


Tasting Notes

When fully cooled and first sliced, the crust is thin and chewy. The crumb is amazingly open for such a low-hydration bread, and a most attractive yellow color. The slices show that the multiple shaping steps did not over-de-gas the dough. The profile shape is pleasing. On tasting, the crumb is mildly chewy. There is a slight yeasty aroma. The flavor is balanced and mild with some nutty, some sweet and very little if any sour tang. When eaten toasted the next morning, the crust becomes pleasingly crisp. The crumb is a bit more tender. The flavor is similar to that of a couple hours after baking.

When tasted dipped in a local, low-acid, fruity EVOO, this bread is transformed into something ambrosial. Of course, Puglia is famous for both Pane di Altamura and for its ancient olive groves, so it is no surprise. The neutral flavor of the bread allows the full, complex flavor of the oil to come through, and the oil brings out the sourdough tang that was otherwise faintly present in the bread. Delicious!  

Photo Gallery

Fully fermented dough, on the board prior to first pre-shaping (Step 9) 

Pre-shaped dough, wrapped in baker's linen for a rest

After first pre-shaping and a 30 minute rest wrapped in linen

Dough after second pre-shaping as a bâtard (Step 12)


A helpful illustration of shaping I found on the agradolce.it web site (Pane di Altamura | Agrodolce)


My loaf, after final shaping. On a peel, ready to bake. (Step 15)

Pane Tipo di Altamura

A slice

Crumb, close-up


Final Notes

This bread is fun to make. The dough is easy to mix and enjoyable to handle. Shaping is a challenge. I am pleased with the result. The baked loaf is attractive.

 I do not find the bread provides outstanding eating by itself or with butter, however, dipped in olive oil as is traditional, it is transformed into a wonderful food. It is not merely a vehicle. The olive oil and the bread each compliment the other. (See "Tasting Notes," above.) I still need to taste this bread grilled then rubbed with garlic, another traditional way of eating it.

The obvious necessity is a trip to Altamura to calibrate my expectations.

 David 


dmsnyder's picture
dmsnyder

Semolina Capriccioso

DMSnyder

March 25, 2016


This bread combines many streams of inspiration – my own Pugliese Capriccioso and San Joaquin Sourdough, Hamelman's Semolina Bread and Tom Cat's Semolina Filone, as described by Maggie Glezer in “Artisan Baking.”

 This is a high hydration dough that is a challenge to mix and shape. Because it was so gloppy, even after machine mixing and multiple stretch and folds in the bowl, I decided to retard the dough in bulk and use the techniques and timing of the San Joaquin Sourdough for shaping and proofing. I had intended to coat the loaves with sesame seeds before proofing, but – again because of how loose the dough was – opted to load onto parchment after proofing and apply the seeds by brushing with water and sprinkling the seeds onto the loaves.


Total Dough Ingredients

Wt (g)

Baker's %

AP flour

223

40

Fine durum flour

334

60

Water

446

80

Salt

11

2

Sesame seeds, toasted

29

5

Sesame seeds (un-toasted) to coat loaves


Total

1043

187

20% of the flour is pre-fermented.


Biga Naturale Ingredients

Wt (g)

Baker's %

Fine durum flour

97

100

Water

48

50

Active starter (50% hydration)

21

22

Total

166

172

  1. The day before baking, mix the biga.

  2. Ferment until doubled in volume at 76ºF.

  3. Refrigerate overnight


Final Dough Ingredients

Wt (g)

AP flour

223

Fine durum flour

223

Water (Warm - 80-85ºF)

391

Salt

11

Biga naturale

166

Sesame seeds, toasted

29

Total

1043


Method

  1. Take the biga out of the refrigerator and let it warm up for about an hour.

  2. Mix the water and flours to a shaggy mass, cover and autolyse for 20-60 minutes.

  3. Sprinkle the salt on the dough and add the biga in chunks.

  4. Mix at Speed 1 for 1-2 minutes until the ingredients are well-mixed.

  5. Mix at Speed 2 for about 10 minutes. The dough will be quite slack. It will not clean the sides of the bowl but will form a ball on the dough hook,. A large portion of the dough will still be on the bottom of the bowl.

  6. Add the toasted sesame seeds to the dough, and mix on low speed for a couple minutes to distribute them.

  7. Transfer the dough to a lightly oiled bowl with a tight-fitting cover.

  8. Ferment at 76ºF for 2 1/2 to 3 hours with a stretch and fold in the bowl every 30 minutes.

  9. The dough will not expand much, but, if fermented in a clear container, tiny bubbles should be seen throughout it.

  10. Cold retard the dough at about 40ºF until the next morning (8-18 hours).

  11. Divide the dough into two equal pieces. Pre-shape into balls, cover, and let the dough rest for 50-60 minutes.

  12. Shape the pieces as boules or bâtards.

  13. If bâtards: Place the loaves on a linen couche seam-side up and cover. If boules: Place the loaves in a well-floured banneton, seam-side up, and cover.

  14. Proof at room temperature until the dough springs back slowly when you poke a finger into it. (About 40 minutes)

  15. 45-60 minutes before baking, preheat the oven to 500ºF with a baking stone and steaming apparatus in place.

  16. Transfer the loves seam-side down to a piece of parchment paper the size of your baking stone and slide a peel under it.

  17. Brush the loaves with water and sprinkle them with sesame seeds. Score the loaves as desired.

  18. Steam the oven and turn the temperature down to 460ºF.

  19. Transfer the loaves to the baking stone.

  20. After 12 minutes, remove the steaming apparatus. (If you have an electric convection oven, switch to Convection Bake and turn the temperature down to 440ºF.) Bake for another 14 minutes or until the loaves are done. The crust should be nicely colored. The internal temperature should be at least 205ºF.

  21. (Optionally) Leave the loaves on the baking stone with the oven turned off and the door ajar for another 10 minutes to dry the crust.

  22. Transfer the loaves to a cooling rack. Cool completely before slicing.


After the loaves had cooled, the crust was soft. On slicing, the crumb was moderately open. The crust and crumb were quite chewy. The flavor was sweet and nutty.

I cut a bite-sized piece for my wife who was up to her elbows in washed lettuce for our dinner salad. “Mmmmm ….,” says she. “Why are we making all this other food?”

 This is a delicious bread. It has earned top ranking among my Italian-style sourdough breads. I may try making it with a somewhat lower hydration. Might try “shaping” this dough as Ciabattas. It should be tried as rolls as well. Gonna be a fun set of experiments!

 Happy baking!

David


dmsnyder's picture
dmsnyder

Hamelman's 5-Grain Levain is always a delight with a crunchy crust and moist crumb full of seedy goodness. Highly recommended. Specifically, take the no-added-yeast/cold retard overnight option. It truly does make an enormous difference in flavor - for the better.

The exuberant oven spring and bloom is characteristic of this bread.


The Dried Fig-Toasted Hazelnut Levain is a bread I made during the San Francisco Baking Institute Artisan II (Sourdough baking) workshop. Well, that was a Raisin-Walnut bread, but every combination of a dried fruit and a toasted nut I have tried so far has made a delicious bread. Here's the formula and procedures:  

Total Formula

Baker's%

Wt. (g)

AP Flour (11.7% protein)

71.57

383

Whole Wheat Flour

19.77

106

Rye Flour (Medium rye)

8.66

46

Water

67.62

362

Yeast (Instant)

0.08

1

Hazelnuts (toasted, peeled & chopped)

15.81

85

Dried Calmyrna figs (diced and rinsed)

19.77

106

Salt

2.13

11

Total

205.41

1100


Firm Levain

Baker's%

Wt. (g)

AP Flour (11.7% protein)

95

77

Rye Flour (Medium rye)

5

4

Water

50

40

Active firm starter

60

48

Total

210

169

  1. Dissolve the firm starter in the water.

  2. Add the flours and mix and knead until there is no visible dry flour.

  3. Shape into a ball. Place in a clean bowl. Cover tightly.

  4. Allow to ferment overnight (12 hours at room temperature).

  5. Toast hazelnuts, at 300ºF Convection (or 325ºF bake) for 16 minutes. Allow to cool then peel and place in a jar or bowl and cover.


Final Dough

Wt. (g)

AP Flour (11.7% protein)

275

Whole Wheat Flour

106

Rye Flour (Medium rye)

42

Water

305

Yeast (Instant)

1

Hazelnuts (toasted)

85

Dried Calmyrna figs (diced)

106

Salt

11

Firm Levain

169

Total

1100

Procedures

  1. Pour the water into the bowl of a stand mixer.

  2. Add the flours and mix with the paddle attachment at slow speed until a shaggy mass is formed. The dough should be medium soft.

  3. Remove the paddle. Scrape the dough together. Cover the mixer bowl and let it rest for 20-60 minutes.

  4. Cut the hard stems off the dried figs. Cut the figs into medium dice (about the size of raisins). Place the diced figs in a fine sieve and run water over them, mixing them with your fingers and separating the pieces stuck together. Place the sieve over a bowl to drain until ready to mix the figs into the dough.

  5. Sprinkle the salt and the yeast over the dough. Add the firm levain in several pieces. Mix with the hook attachment at slow speed for 1 or 2 minutes, then increase the speed to Speed 2 and mix for 5-8 minutes. D.D.T. is 78-80ºF.

  6. When moderate gluten development has been achieved, scrape down the dough. Add the figs and nuts to the mixer bowl and mix with the hook at slow speed for 2 to 3 minutes.

  7. Transfer the dough to a floured board and knead it for a couple minutes to better distribute the nuts and figs. Then transfer it to a lightly oiled bowl and cover.

  8. Ferment for 2 hours at 76ºF with a stretch and fold at 60 minutes.

  9. Divide into two equal pieces and pre-shape as boules. Cover and let the gluten relax for 20-30 minutes.

  10. Shape as bâtards and place, seam-side up, in floured brotformen or onto a linen couche.

  11. Cover and proof for 90 to 120 minutes at 80ºF.

  12. Pre-heat oven to 500ºF with baking stone and steaming apparatus in place for 45-60 minutes before baking.

  13. Transfer loaves to a peel. Turn down oven to 460ºF. Score the loaves as desired. Steam the oven. Load the loaves onto the stone.

  14. After12 minutes, remove the steam source. If you have a convection oven, switch on the fan and reduce the temperature to 435ºF. Bake for 12-14 minutes more. The loaves are done when nicely browned, they sound hollow when thumped on the bottom and the internal temperature is over 205ºF.

  15. Optionally, leave the loaves on the baking stone with the oven turned off and the door ajar for another 8-10 minutes to further dry the crust.

  16. Transfer to a cooling rack and cool completely before slicing.

Happy baking!

David 

dmsnyder's picture
dmsnyder

Sunday, I baked a couple loaves of Hamelman's Pain au Levain with Whole Wheat. This is a wonderful everyday bread for me. It's a favorite player in a host of bread roles. (No pun intended.) I see that alfanso has nominated it for some prestigious post - I can't figure out which one, but we definitely share an admiration for this bread. Here's mine:


Monday, I baked a bread that is new to me - The Berliner Landbrot about which Stan Ginsberg blogged recently (See: Berlin Rye/Berliner Landbrot). This is a 90% rye with an extremely simple and fast procedure, especially if you already have a rye sour sitting in the fridge, waiting for gainful employment.

This came out of the oven early yesterday afternoon. After it had cooled, I wrapped it in baker's linen. I resisted cutting it for breakfast this morning, but I had some for lunch, spread with cream cheese and topped with gravlax. The crust was chewy. The crumb is cool, surprisingly light and creamy. The flavor is mildly sour, but very assertively RYE. I love it, and I am pleased to say that my wife has finally come around to enjoying high-rye percentage breads too.

This is very definitely a bread I will add to my long list of breads to bake often, which is clearly a prescriptive list, not a descriptive one.

Happy baking!

David

dmsnyder's picture
dmsnyder

Recently, some one posted a comparison of the Tartine breads and those of Ken Forkish. This reminded me how long it had been since I had baked a Tartine Basic Country Bread. I can't find that TFL entry now, but it doesn't matter ... even if it was just in my imagination. Here's what happened:

These loaves are still cooling. I will post a crumb photo and tasting notes when I slice one.

I also baked a couple of San Joaquin Sourdough bâtards. These were cold retarded 36 hours and have been frozen to eat later.

Looking through Tartine: Bread, I am reminded that there are a number of breads there that look wonderful and that I have never  made. I guess I will add them near the top of my "to bake list."

Happy New Year, and Happy Baking to the TFL community!

David

dmsnyder's picture
dmsnyder

Walnut-Fig Sourdough Bread: Variation on a favorite from SFBI Artisan II

David Snyder

7 December, 2015

This blog entry could have been titled “So many breads, so little time.” Or “time flies when you're having fun.”

One of my favorite breads from the San Francisco Baking Institute sourdough workshop I took in December, 2010 was a sourdough Raisin-Walnut bread. I made it at home a couple weeks after I got home from the workshop, and it was really delicious, even without a deck oven bake. I wrote about it back then and said I expected to make it often. Ha! I not only haven't made it since then, I couldn't even remember that I had made it at home. All I remembered was that brother Glenn and his wife particularly liked it.

Well, I suppose I could also title this entry “Better late than never,” because I made this bread again yesterday, only substituting diced dried figs for the raisins, and all I can say is, “I should have been making it often,” because it is truly a delicious bread – I think my favorite of the many combinations of sourdough-dried fruit/toasted nut breads I have made.


Total Formula

Baker's%

Wt. (g)

AP Flour (11.7% protein)

71.57

383

Whole Wheat Flour

19.77

106

Rye Flour (Medium rye)

8.66

46

Water

67.62

362

Yeast (Instant)

0.08

1

Walnuts (toasted)

15.81

85

Dried Calmyrna figs (diced)

19.77

106

Salt

2.13

11

Total

205.41

1100


Firm Levain

Baker's%

Wt. (g)

AP Flour (11.7% protein)

95

77

Rye Flour (Medium rye)

5

4

Water

50

40

Active firm starter

60

48

Total

210

169

  1. Dissolve the firm starter in the water.

  2. Add the flours and mix and knead until there is no visible dry flour.

  3. Shape into a ball. Place in a clean bowl. Cover tightly.

  4. Allow to ferment overnight (12 hours at room temperature).

  5. Toast shelled walnuts, broken or chopped coarsely, at 300ºF for 8 minutes. Allow to cool then place in a jar or bowl and cover.


Final Dough

Wt. (g)

AP Flour (11.7% protein)

275

Whole Wheat Flour

106

Rye Flour (Medium rye)

42

Water

305

Yeast (Instant)

1

Walnuts (toasted)

85

Dried Calmyrna figs (diced)

106

Salt

11

Firm Levain

169

Total

1100

Procedures

  1. Pour the water into the bowl of a stand mixer.

  2. Add the flours and mix with the paddle attachment at slow speed until a shaggy mass is formed. The dough should be medium soft.

  3. Remove the paddle. Scrape the dough together. Cover the mixer bowl and let it rest for 20-60 minutes.

  4. Cut the hard stems off the dried figs. Cut the figs into medium dice (about the size of raisins). Place the diced figs in a fine sieve and run water over them, mixing them with your fingers and separating the pieces stuck together. Place the sieve over a bowl to drain until ready to mix the figs into the dough.

  5. Sprinkle the salt and the yeast over the dough. Add the firm levain in several pieces. Mix with the hook attachment at slow speed for 1 or 2 minutes, then increase the speed to Speed 2 and mix for 5-8 minutes. D.D.T. is 78-80ºF.

  6. When moderate gluten development has been achieved, scrape down the dough. Add the figs and walnuts to the mixer bowl and mix with the hook at slow speed for 2 to 3 minutes.

  7. Transfer the dough to a floured board and knead it for a couple minutes to better distribute the nuts and figs. Then transfer it to a lightly oiled bowl and cover.

  8. Ferment for 2 hours at 76ºF with a stretch and fold at 60 minutes.

  9. Divide into two equal pieces and pre-shape as boules. Cover and let the gluten relax for 20-30 minutes.

  10. Shape as bâtards and place, seam-side up, in floured brotformen or onto a linen couche.

  11. Cover and proof for 90 to 120 minutes at 80ºF.

  12. Pre-heat oven to 500ºF with baking stone and steaming apparatus in place for 45-60 minutes before baking.

  13. Transfer loaves to a peel. Turn down oven to 460ºF. Score the loaves as desired. Steam the oven. Load the loaves onto the stone.

  14. After12 minutes, remove the steam source. If you have a convection oven, switch on the fan and reduce the temperature to 435ºF. Bake for 12-14 minutes more. The loaves are done when nicely browned, they sound hollow when thumped on the bottom and the internal temperature is over 205ºF.

  15. Optionally, leave the loaves on the baking stone with the oven turned off and the door ajar for another 8-10 minutes to further dry the crust.

  16. Transfer to a cooling rack and cool completely before slicing.

The crust was quite crunchy. The crumb was light and quite tender. (I think the tiny bit of instant yeast really contributed to the nice crumb texture.) The flavor is complex with clear elements of sourdough, with a lovely, creamy lactic acid predominating, toasted walnuts and sweet, chewy figs.

This bread is probably a pretty well-balanced meal eaten plain, but it is wonderful with sweet butter, toasted or not, and with almond butter. All the sourdough breads with nuts I have made are great with cheese. Walnut breads with thin slices of Cotswold cheese is a great combination. I am thinking this bread might make extraordinary French toast. Breakfast tomorrow?

Yesterday, I also made a couple loaves of Hamelman's “Pain au Levain with Whole Wheat Flour.” They were retarded overnight and baked today.

Today, I made Hamelman's “5 Grain Sourdough” which is now retarding to bake tomorrow. (You know, I was out of town for Thanksgiving, which brother Glenn and his wife hosted this year. So my baking itch needed serious scratching this week. By the way, that “Pain au Levain with Whole Wheat Flour” makes pretty wonderful Thanksgiving dressing. My wife makes the 3-onion stuffing from a 1995 Gourmet magazine.)

Happy baking!

David

dmsnyder's picture
dmsnyder

Pain au Levain from Della Fattoria Bread, by Kathleen Weber

November 10, 2015

David Snyder


Introduction

My brother, Glenn, bought me a surprise present: A copy of Kathleen Weber's bread cookbook. When I called to thank him, he revealed his motive. He thought I'd like it. We Snyder kids do that sort of thing for each other.

I have had the considerable pleasure of sampling Della Fattoria's breads both at the San Francisco Ferry Building Farmer's Market, where they come with breads and pastries on Saturdays, and also at their cafe in Petaluma, California. They make good stuff. But I believe I first heard of that bakery quite a few years before. It was the “Small Artisan Bakery” featured in Maggie Glezer's Artisan Baking, an award winning book published in 2000.

Weber's book was published in 2014, and it is interesting to compare her methods and how they changed in the interval since she was interviewed by Ms. Glezer. Notably, she began using an autoyse step. She reduced the speed and duration of her mechanical mixing. And she added stretch and folds during bulk fermentation. All three of these changes reflect trends in Artisan baking nationally. All would be expected to enhance the flavor of the product.

Since I am on the subject of Weber's methods in general, her other remarkable idiosyncrasy is that she includes her firm levain in her autolyse, withholding only the salt. And one trend she does not follow (unfortunately, in my opinion) is to not use baker's math in presenting for formulas.

Pain au Levain

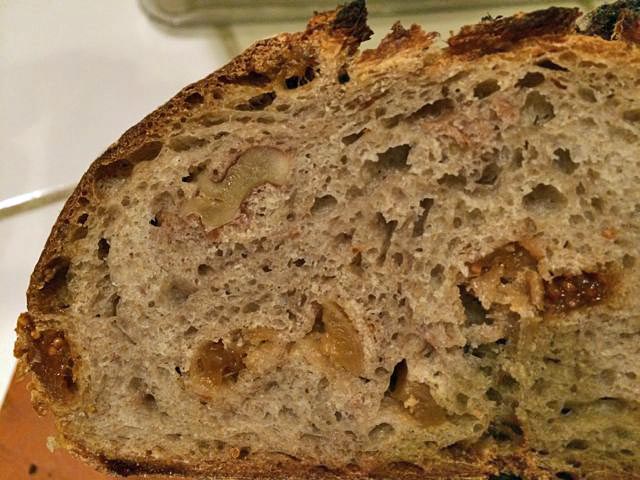
Weber's Pain au levain dough is the base for several variations, recipes for which are given in the book. These include a “Potato Levain,” a “Walnut Levain,” a “Sausage-Sage Levain” and other equally tempting breads. For a first bake from this book, I selected the Pain au Levain without any of the additions.

Weber uses a firm levain. She gives clear instructions for making it from scratch. Her mature levain is a 50% hydration mix of 90% All Purpose flour and 10% Whole Wheat flour. She feeds her levain with 23% mature starter. My own customary firm starter isn't very different from this, and that is what I used to feed the levain.


Total dough


Ingredient

Wt (gms)

Bakers' %

Water (80dF)

606

82.5

AP flour

457

62.2

WW flour

209

28.4

Medium Rye meal+

68

9.3

Sea salt

16

2.2

Total

1356

184.6

+ Weber calls for pumpernickel flour. I have some, but I have some older rye meal that I thought would work well, and it needed using.


Levain


Ingredient

Wt. (gms)

Bakers' %

Mature firm starter

15

23

AP flour

57

90

WW flour

6

10

Water (80dF)

31

50

Total

109

173

  1. Disperse the firm starter in the warm water.

  2. Add the flours and mix very well.

  3. Form into a ball and place in a clean, covered container.

  4. Ferment in a warm place until at least doubled in volume. (4-6 hours, for me).


Final dough


Ingredient

Wt (gms)

Levain

109

Water (80dF)

551

AP flour

408

WW flour

204

Medium Rye meal

68

Sea salt

16

Total

1356

Procedures

  1. Place the levain and the water in the bowl of a stand mixer.

  2. With the paddle, run the mixer at low speed for 1 to 2 minutes, until the levain is dissolved.

  3. Add the flours to the mixer bowl and pulse a few times to start mixing (to prevent flour flying everywhere).

  4. Mix at low speed for 1-2 minutes until the dough forms a shaggy mass. Scrape it together.

  5. Cover the bowl and let the flour absorb the water and start gluten development for 20-30 minutes.

  6. Sprinkle the salt over the dough. Put the dough hook on the mixer.

  7. Run the mixer at low speed for 6 minutes, then at Speed 2 for another 2-3 minutes. (This is a very sloppy dough. It will have some gluten development but will not have cleaned the sides of the bowl. Resist adding more flour.)

  8. Transfer the dough to a lightly oiled 8-10 cup bowl. Do a few “stretch and folds in the bowl.” Cover the bowl, and place it in a warm location. (I used a Proofing Box set at 76dF.)

  9. Perform stretch and folds in the bowl every 30 minutes three times (at 30, 60 and 90 minutes).

  10. Let the dough continue to ferment until it has about doubled in volume and is light and airy. (This was an additional 2 hours for me.)

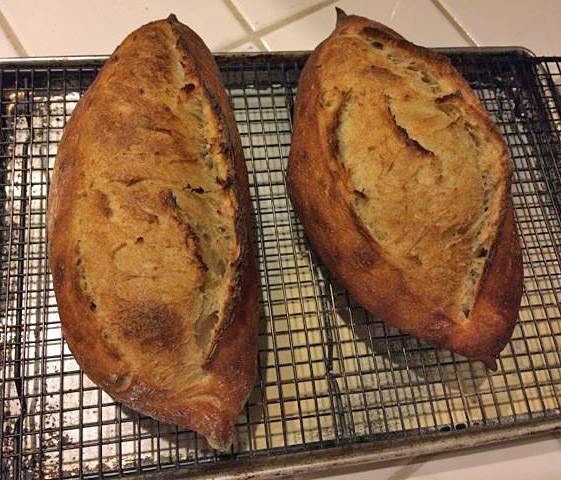
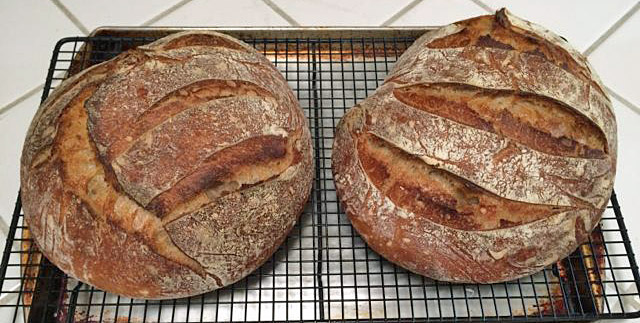
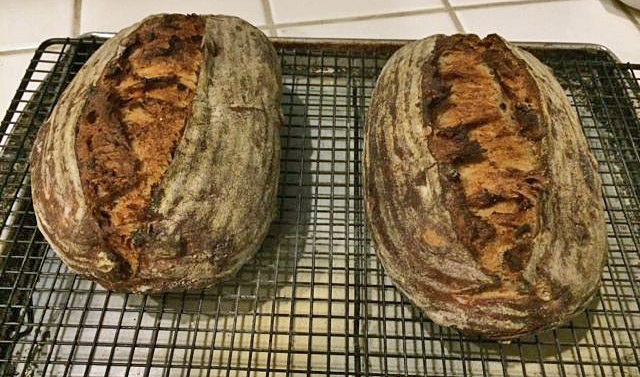
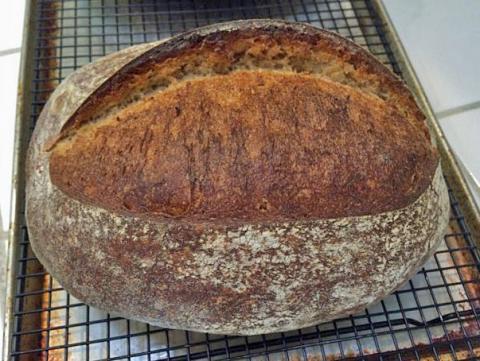
  11. At this point, you can pre-shape the entire dough to make one large loaf or divide it in half to make two loaves. I divided it into two equal pieces.

  12. Pre-shape into a ball or a log. Cover with a damp towel and let rest for 10-20 minutes.

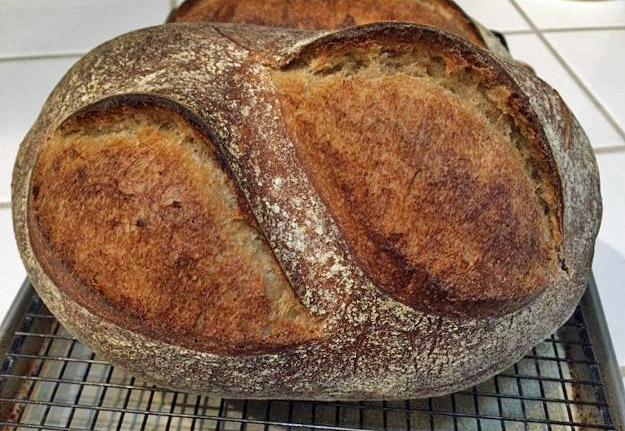
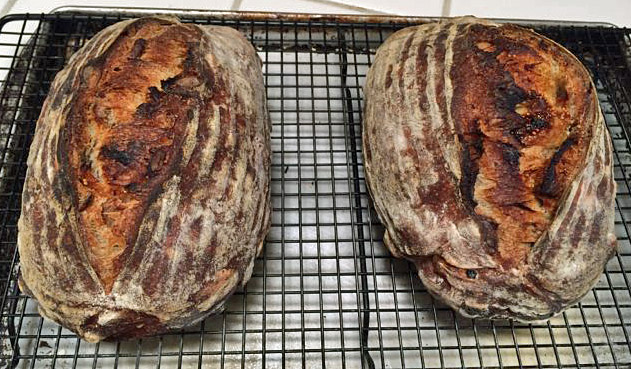
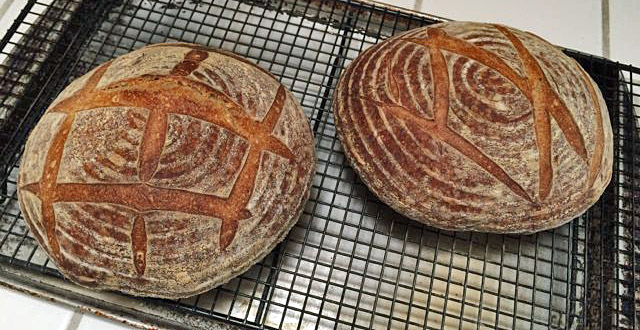
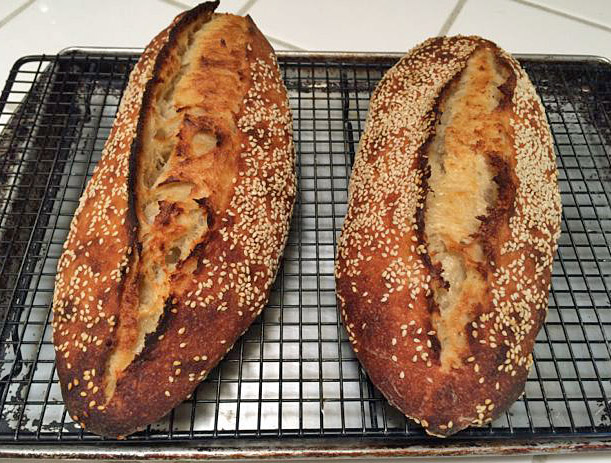
  13. Shape as a boule or bâtard. Place in bannetons or on a couche to proof.

  14. Proof for about 1.5 to 2 hours or until the depression left when you poke a loaf fills very slowly or remains. (I proofed for about 2 hours at 80dF in the proofing box. I think I slightly over-proofed.)

  15. While the loaves are proofing, preheat your oven to 500dF with a baking stone and your steaming apparatus in place. (Weber recommends a 9” cast iron skillet preheated. She then puts a cooling rack with ice cubes on the skillet at the time she loads her oven.)

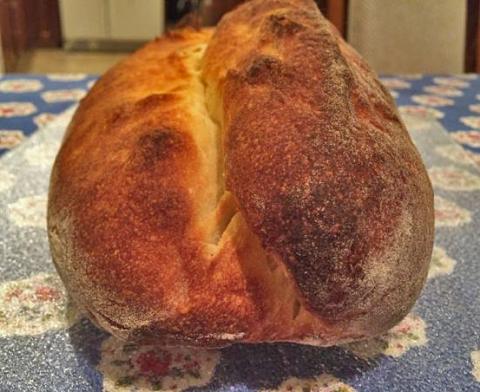
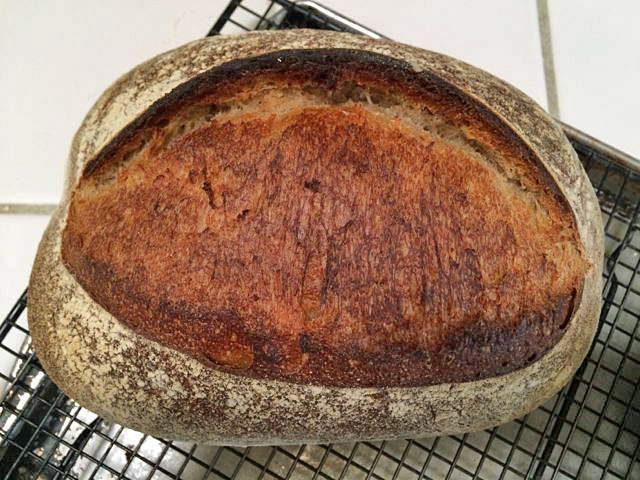
  16. When they are proofed, transfer the loaves to a peel. Steam the oven. Score the loaves and load them onto the stone. Turn the oven down to 450 or 460.

  17. Bake with steam for 15 minutes, then remove the steam source and continue baking for another 30 minutes (if baking 700g loaves) or 40 minutes (if baking a 1.3kg loaf.). The bread should be well-colored. It should sound hollow when thumped on the bottom. Internal temperature should be at least 205dF.

  18. Remove loaves to a cooling rack. Cool thoroughly before slicing.


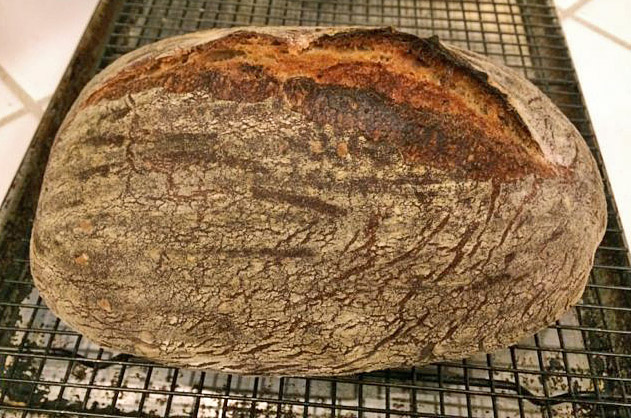
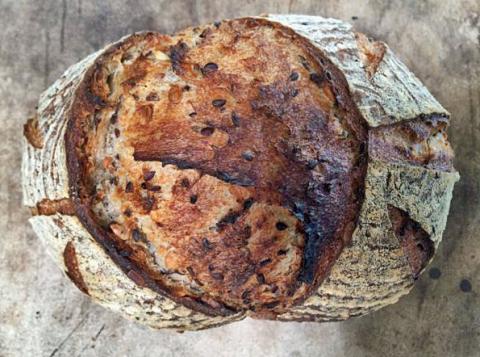
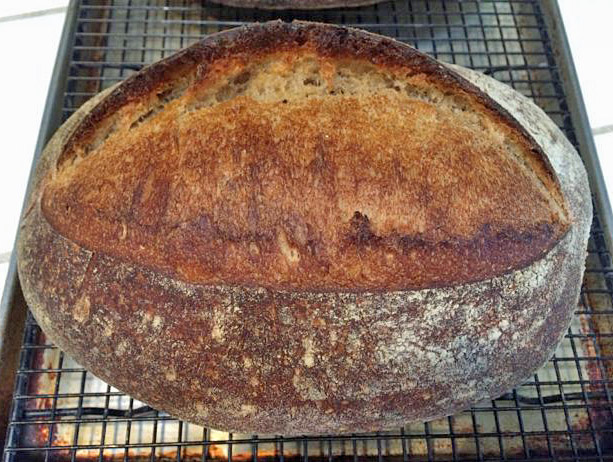
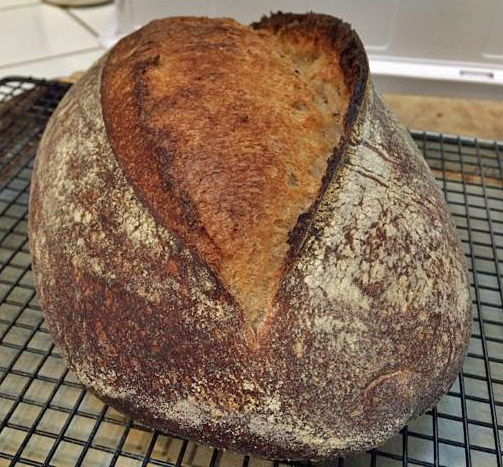
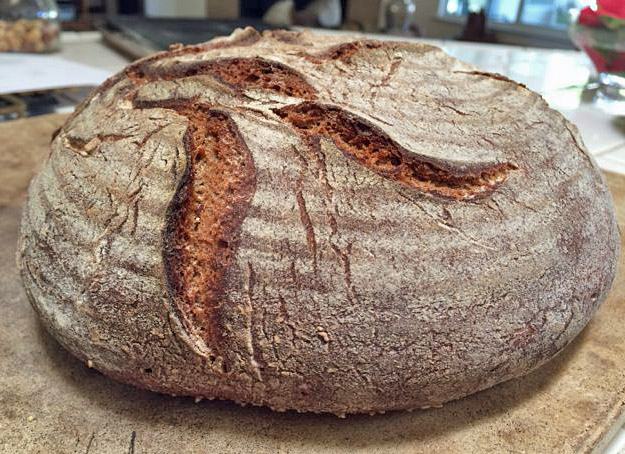
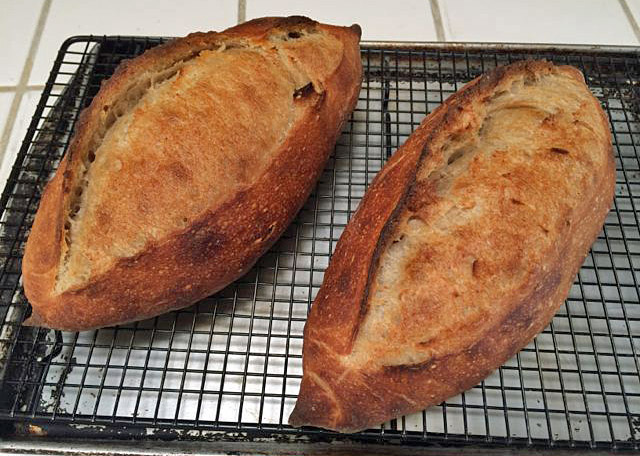
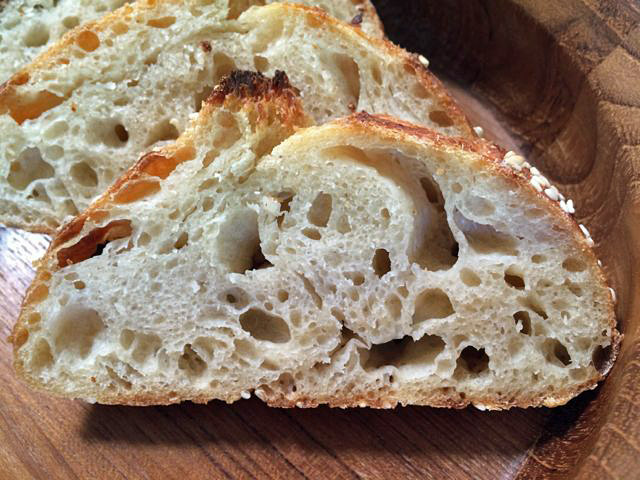
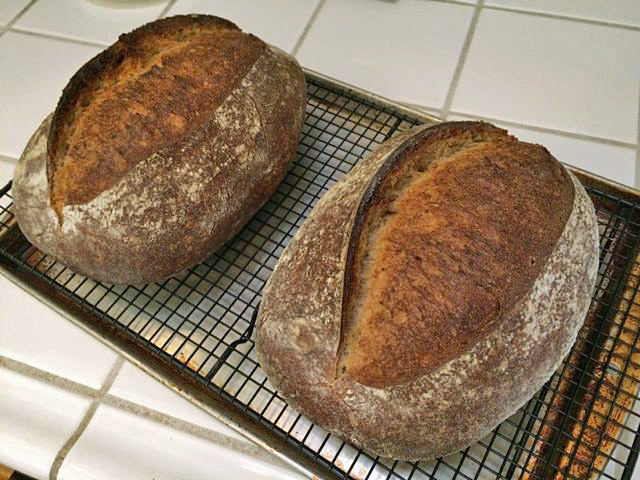
The cuts didn't open up as much as I expected, but I think that was due to over-proofing. There was some tunneling under the top crust which suggests the same.

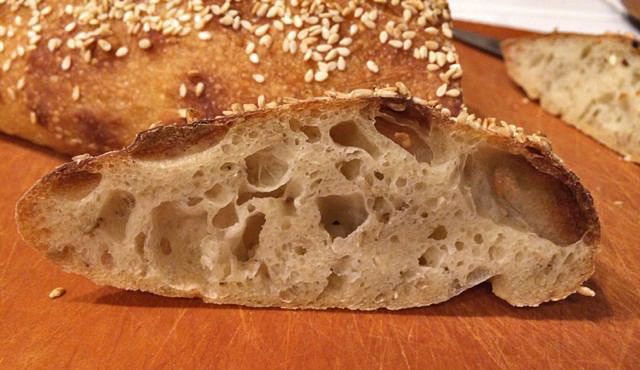
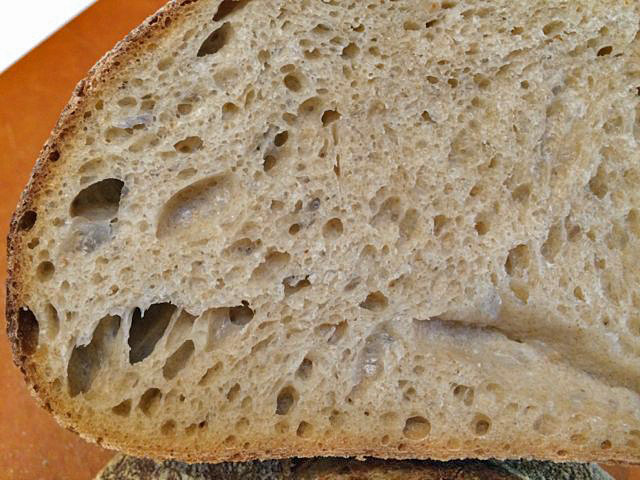
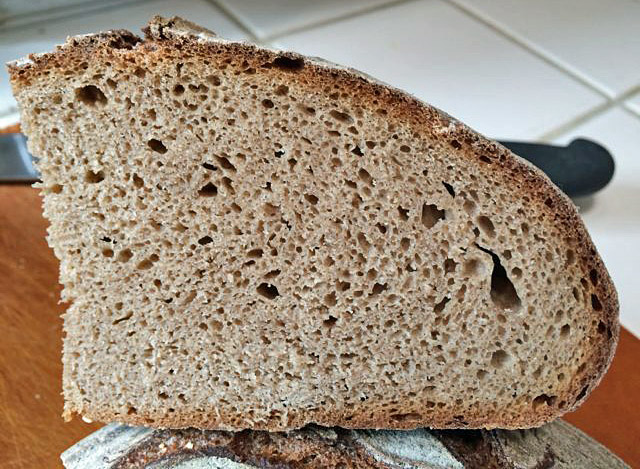
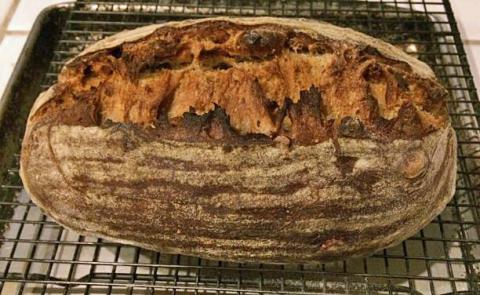
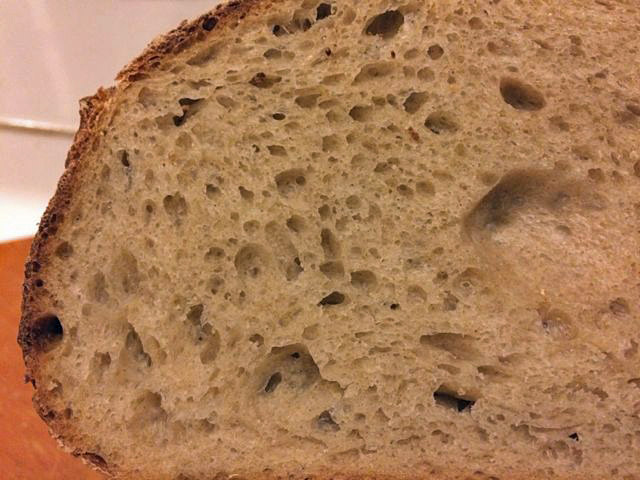
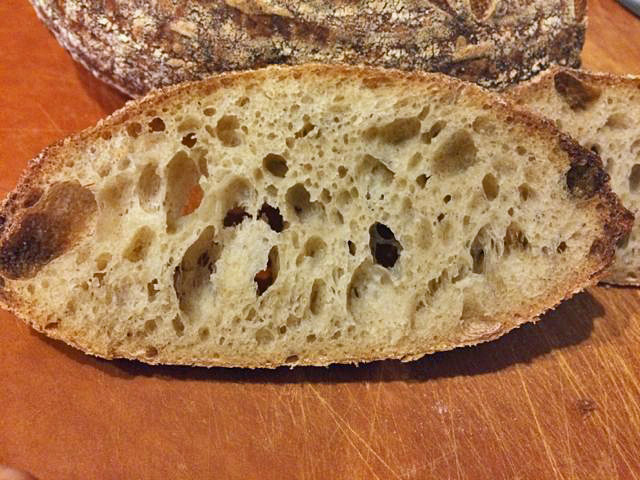
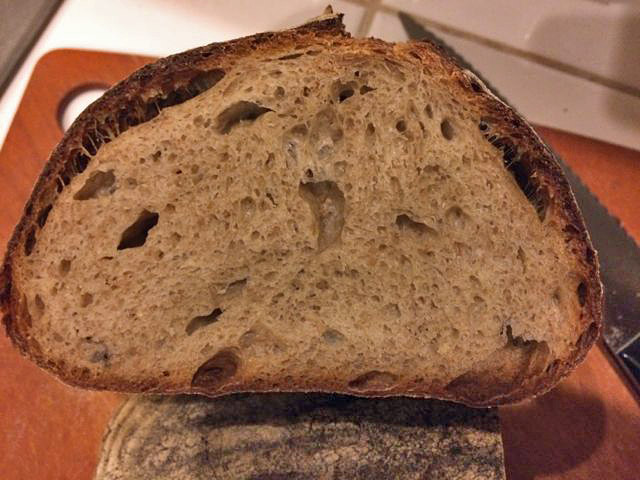
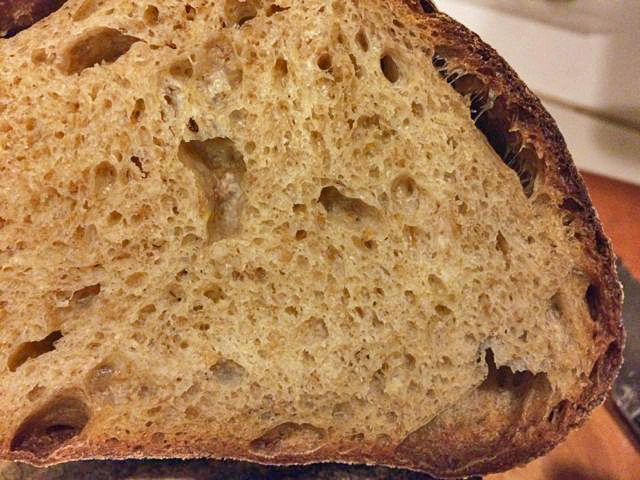
The crust was crunchy at first but softened by the next day. Not surprising in an 82% hydration bread. The crumb was well aerated but with small, regular holes. The flakes of rye bran were quite visible. I'm sure the whole grain flours determined the crumb structure.

The flavor of the bread was very nice. It had the wheaty and nutty flavors of the whole wheat and the earthy flavors of the rye, both very prominent. There was discernible sourdough tang, but it was very mild. The one negative is that it tasted too salty to me. Looking at the baker's math, you can see that, in fact, there is a much higher percentage of salt in this bread (2.2%) than in most.

This is a good sandwich bread. It is good with cheese and with almond butter. When I first tasted it, I had the thought that I could make a meal of it alone.

I like this bread. If you have a recently fed starter, and you get an early start, it could be done for dinner in one day. I expect to be including it in my regular rotation. But I to want to try a number of the other breads in Weber's book also. I will report on them, when I do.

Happy baking!

 David

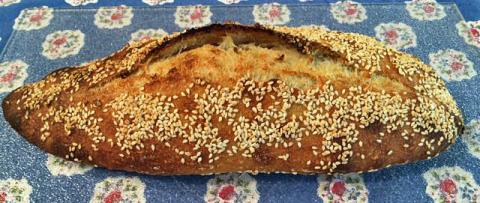
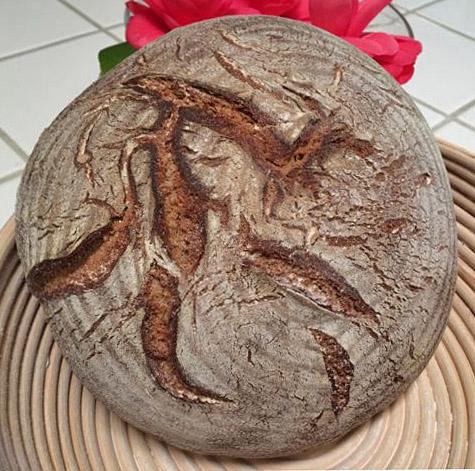
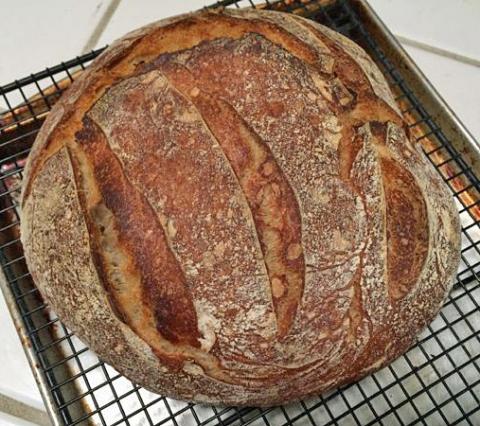
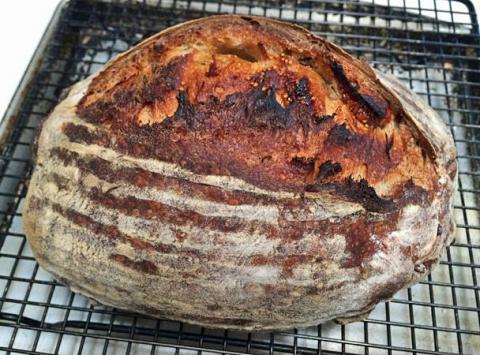
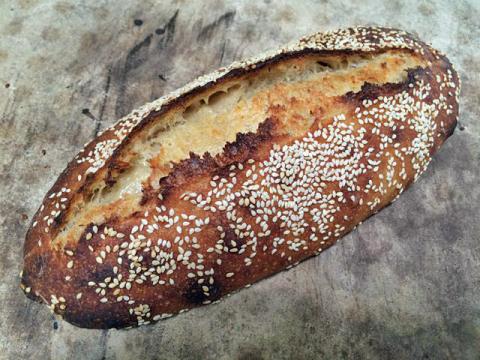
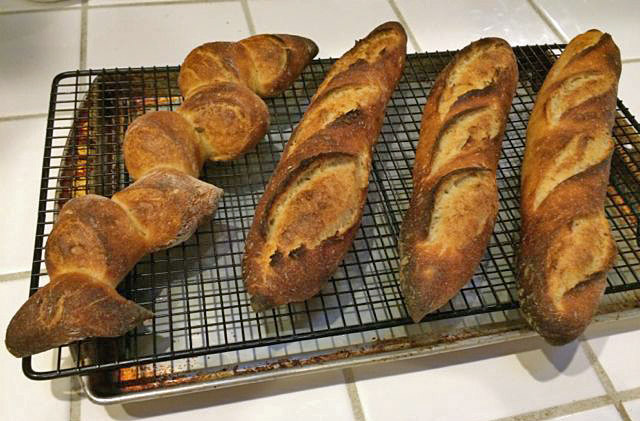
 P.S. I made a couple loaves of San Joaquin Sourdough too.

dmsnyder's picture
dmsnyder

I have made a variety of sourdough breads with nuts and with nuts and dried fruits. For some examples, see:

San Francisco-style Sourdough Bread with Walnuts and Figs

San Francisco-style Sourdough Bread with Walnuts and Sour Cherries

Potato-Nut Bread from South Tyrol (Thanks, Salome!)

This weekend's breads (mountain dog's formula seen here: Cherry Pecan Pain au Levain.)

I have liked them all. For the past couple of years, when I bake these I have used just a bit less than 20% (baker's percentages, of course.) fruit and the same percentage nuts. Looking through some of my newer bread books, I noticed a number of sourdough breads with nuts and dried fruits that used 1.5 to 2 times the proportions of them as I had been using. So, I thought I would take one of my known formulas and simple double the nuts and fruit. How could it be bad? 

My base formula was the one for Walnuts and figs. (See the link, above.) But I had just bought some lovely pecans, so I weighed out 200g and toasted them for 6 minutes at 300dF and made Sourdough bread with pecans and dried figs.

The dough looked awful lumpy, even when the loaves were proofed and ready to bake. I dunno about this ....

The bake took about 10 minutes longer than usual for a bâtard this size, presumably because the extra figs evaporated more water, thus keeping the loaes cooler. Maybe. But, the loaves had better bloom than usual for this type of bread, the crumb looked pretty nice, and the taste was wonderful. (It passed the critical "Susan leaves the dinner table to cut herself another slice" test.)

I also baked a couple loaves of My San Francisco Sourdough Quest, Take 4.

A good baking weekend. I hope yours was too.

Happy baking!

David

dmsnyder's picture
dmsnyder

I had a hard time choosing a title for this blog entry. I thought about "SMSJSD," which you would eventually discover stands for "Senior Moment San Joaquin Sourdough." I thought about "Invulnerable Bread." I mostly thought about not posting anything about this bake. There is nothing new ... except that these loaves turned out so well in spite of my forgetting to ... Okay. Here's what happened.

On Tuesday, I mixed the dough for my "Italian" version of San Joaquin Sourdough following the formula and procedures I described in Sourdough Italian Baguettes. But I also had a few other projects in process at the same time. As I usually do, I set an alarm to go off when I needed to do something with the dough, but I must have ignored the last one. Instead of retarding the dough when it was ready, I kept working on other stuff. By time I left home for my 6:30pm Italian class, I had forgotten completely that there was dough fermenting. I didn't remember it until I got back home at 8:15pm and went to the kitchen to make a late dinner for me and my wife, and there was the dough, expanded to 4 times its original volume and ready to overflow the bowl! Yikes!

I thought about tossing it and starting over the next day but decided to refrigerate the dough and decide what to do the next morning. Well, the next morning I dumped the dough on my board, and, you know, it felt okay. So, I pre-shaped it and continued with my normal procedure. I considered the possibility I should shorten the proofing because of the prolonged bulk fermentation, but the dough didn't act over-proofed. And you know what, it turned out no differently than usual, except the crumb was less yellow than usual. 

I thought that the really long fermentation would result in a more sour flavor, but the flavor was no different than usual for this bread. It was really good!  I can't account for why my drastic over-fermentation didn't ruin the bread, but I'm certainly not complaining.

We had a nice sunset, too.

Happy baking!

David

dmsnyder's picture
dmsnyder

Nothing new this week, but two of our current favorites, baked yesterday and today.

San Joaquin Sourdough Baguettes. The left-most as an Epi.

We had finished off the last batch of these for dinner the night before - Sandwiches of Smoked Chicken/Apple Sausages with spicy brown mustard. Last night, we had some of the Epi, still warm, with a beet, fennel and blue cheese salad and cold roast chicken.

Pain au Levain with Whole Wheat Flour from Hamelman's Bread

If I could have only one bread to eat the rest of my days, this one would certainly make the final four. Tonight, fresh out of the oven, it was particularly delicious with a thin spread of very fresh Point Reyes Blue Cheese. Yum!

Happy baking!

David

Pages

Subscribe to RSS - dmsnyder's blog